
History · Questions & answers (12)
PixelRun — User Guide (v0.8)
ivo3d FX · After Effects / Premiere Pro · Windows (macOS coming)
PixelRun is a pixel sorter. It rules the layer into parallel bands, picks out the stretches of each band that the picture itself nominates — the highlights, the shadows, a channel, or a noise field — and re-orders the pixels inside each of those stretches by brightness, hue, saturation, alpha or a single colour channel. Nothing is added and nothing is blurred: within a sorted run the output holds exactly the same pixels as the input, only in a different order. Outside the runs the frame is untouched, bit for bit — in every mode but one, and that one says so on the tin (Spaced Out, below).
That is the whole idea, and everything else in the panel is a way of choosing where the runs are, how long they are allowed to get, what they sort by, how much of each run takes part, and — optionally — whether the finished run also floats away from where it was found or stretches past its own length. Bands can run at any angle, or radiate from a point as spokes.
One thing in v0.5 is not sorting at all. Sorting is a permutation: it re-orders pixels without moving any of them out of their run, so no pixel can rise above another and a one-pixel run cannot change. Extrude mode gives every selected pixel a height of its own instead — each one is copied along the band for as many pixels as its own driver value asks for, and the pixel in front hides the one behind it only up to its own height. What you get is a skyline drawn by the picture, and unlike sorting it works on runs a single pixel long. It is a two-dimensional height field, not 3D: there is no mesh, no camera and no lighting model, and the output is the same pixel raster as every other mode.
Find it under Effect → ivo3d FX → PixelRun. It works in 8, 16 and 32 bpc, supports Multi-Frame Rendering, and every parameter can be keyframed or driven by expressions. The effect is time-independent: a still frame with still parameters renders once and caches — animation comes from the footage itself or from your keyframes. That is still true of the new Animation group: Anim Growth and Cycle are ordinary parameters that you keyframe yourself, not a clock the plugin reads.
Upgrading from v0.2. Everything v0.3 adds is off at its default. Open a v0.2 project in v0.3 and the render is bit for bit what it was — Block Width and Block Height are 1, Upper Threshold is 100%, Affect is Inside Thresholds, Noise Amount is 0, Seed is 0, Offset and Offset Random are 0, Anim Growth is 100%, Cycle is 0°, Output Mode is Sorted Pixels, both Feather values are 0, and Preserve Alpha is off. Each of those is a documented no-op, not an approximation: the code takes the old path.
Upgrading from v0.5 to v0.6. One new parameter (disk ID 86) and one widened range. Invert Height is off by default, and Top Light / Shade still defaults to 0, so a v0.5 project opens rendering bit for bit what it did. Nothing was taken away: Top Light's positive side keeps the same range it had, values above 100% included, and only its name and its lower bound changed.
Upgrading from v0.4 to v0.5. Eleven new parameters (disk IDs 75–85) and one deliberate behaviour change. Everything new is off or zero at its default — Shift Mode still opens on Sort (in place), Absolute Length is off, Base Height and Top Light are 0 — so a v0.4 project opens rendering bit for bit what it did, with one exception you should know about: Break Noise now means cuts per 100 pixels and no longer changes meaning when you change Driver Cell (see Selection). At the default Driver Cell 1 the formula is unchanged, so only projects that combined a Driver Cell other than 1 with a non-zero Break Noise will look different — and those will look more cut, which is what the slider was promising all along. The one other change of default behaviour is in Masks: the coverage is now taken from the layer's alpha — After Effects' own mask composite, feather and all — through the new Mask: From Layer Alpha checkbox, which is on by default. Masks themselves are still off by default, so a project that never used them is untouched; a project that used them with a hard mask renders the same either way.
Upgrading from v0.3 to v0.3.1 — one thing changes. v0.3.1 adds a single switch, Limit Length, and it is off by default. With it off, Max Length (px) no longer cuts runs: a selected stretch is sorted whole, from the point where the driver crosses the threshold to the point where it crosses back, however long that is. This is how a pixel sorter is expected to behave (it is what the reference plugin does), and it is the fix for a defect in every earlier build: a run that was cut at a fixed length showed a hard edge exactly Max Length away from wherever the run began — a dead-straight line across the frame wherever a bright region touched the frame edge, and a shifted echo of any shape whose runs were longer than the cap. Those edges are gone at the default. A v0.3 project therefore renders differently in v0.3.1 only where a run was longer than Max Length; switch Limit Length on to get the cutting back (with a better anchor — see Selection). Disk IDs 1–62 are untouched; the switch takes 63.
New defaults in v0.3.1. A freshly applied PixelRun now starts with Band Width 1 and Driver Cell 1 (both were 4): the classic per-row pixel sorter, pixel-exact in both the selection and the sort, which is also how the reference plugin starts. Projects saved with other values keep them — a default only decides what a new instance opens with. The cost is real: with both at 1 the table build at 4K takes roughly 1.8 s single-threaded against about 0.4 s at 4/4 (measured offline, -O2; 1080p: 0.25 s against 0.09 s), because the driver is now averaged per pixel instead of per 4×4 cell and every column is its own band; and in Float / Stretch mode the per-band table grows from ~8 MB to ~32 MB at 4K. The per-pixel shading is unchanged. A Driver Cell of 1 also makes run boundaries follow every grain of the picture — raise either control the moment you want chunkier ribbons, calmer boundaries or a faster preview; Driver Cell 4 alone recovers most of the build time.
History
Where the name comes from
Pixel sorting has a birth date. In 2010 the German artist Kim Asendorf wrote a short program — ASDF Pixel Sort — that walks each row or column of an image, finds the stretches whose brightness lies above (or below) a threshold, and sorts the pixels inside each stretch. He released the code in 2012 and, in his own account, it "proliferated and mutated": it became a staple of glitch art and, in time, of image and video plug-ins. There is no accident in this glitch — the streaks come from a precise generative rule, and the rule is that nothing is invented, only re-ordered. PixelRun keeps that rule (sorting is a permutation, and the unselected frame is untouched bit for bit) and builds the rest on top of it: bands and spokes, ten sort keys, block sorting, run-length rules, floating and stretching runs, a seamless cycle — and two deliberate departures, Spaced Out and Extrude, which the manual calls out because they are the only places the original rule stops holding.
Quick start
- Apply to footage with real tonal contrast. The defaults sort the highlights: a 50% Threshold on luma, 4 px bands, sorted by luma, ascending, in place.
- Drag Threshold down from 50%. The lower it goes, the more of the picture qualifies and the longer the sorted runs become. Push it to 100% and nothing qualifies at all — Threshold 100% gives back the original frame bit for bit, the effect switches itself off and does not even build its tables. (With Affect set to Outside Thresholds the same setting does the opposite and selects everything; see Selection.)
- Set Angle to 90°. The sort now runs along horizontal rows instead of vertical columns — the classic pixel-sort direction. At 0°, 90°, 180° and 270° the sort is an exact permutation of the source pixels; see Sorting below for why that matters.
- Switch Limit Length on and pull Max Length (px) down from 256 to 40. The long smears break into short, tidy blocks — and every cut is a visible edge, which is why the switch is off by default. Switch it back off and a single run can cross the whole frame.
- Try Sort By → Hue with Break Noise around 20%. This is the "glitch" corner of the effect: coherent enough to read as deliberate, broken enough to look damaged.
- Only then touch Shift Mode. Sort (in place) is the honest sorter; Float and Stretch are what turn it into a curtain.
- To make it move, go to Animation. Keyframe Anim Growth from 0 to 100% and the sorting grows out of each run's start; keyframe Cycle from 0° to 360° and the sorted sequence walks along the run and arrives back exactly where it started — a seamless loop with no crossfade.
How long are the runs?
This is the question everyone asks first, and until v0.4 the panel gave a misleading answer. Read this section before you touch anything else.
A "run" is a stretch of pixels the effect sorts as one. Its length is not set by a single slider. Five different things decide it, and only one of them is a length in pixels you type in:
| What | Where | What it does to the length | Driver-modulated? |
|---|---|---|---|
| Threshold + Upper Threshold | Selection | The picture decides. A run starts where the driver crosses Threshold and ends where it crosses back. A soft gradient that stays above the threshold for 400 px gives you a 400 px run. | the content decides |
| Anim Growth | Animation | A percentage of the run's own length — 100% is the whole run, 50% keeps half of it. It is not an absolute length and it has no idea how big your frame is. | no |
| Limit Length + Max Length (px) | Selection | An absolute cap in pixels — but only while Limit Length is on. With the switch off, Max Length does not cut anything. | no |
| Length by Driver (px) (new in v0.4) | Selection | Adds Length by Driver × the run's average driver value to Max Length, signed. Bright runs go long and dark ones stay short — or the other way round with a negative value. |
yes |
| Amount (px) in Stretch mode | Shift | Stretches the finished run by Amount × the run's driver value. This is a stretch, not a selection length. |
yes |
The trap this fixes. In v0.3.2 you could set Max Length to 17, watch the picture smear for hundreds of pixels, and reasonably conclude the plugin was broken. It was not — Limit Length was off, so Max Length was not cutting; it was only feeding the Global Depth Ramp and the by Length gradient. The panel did not say so. From v0.4 it does: every parameter that cannot currently affect the render is greyed out, so a switched-off control looks switched off.
The slider is not the limit. Every pixel-length control in this panel drags over a comfortable working range, not its full range. The number beside the slider accepts a great deal more — click it and type. On a 1920-wide frame you will run out of slider long before you run out of parameter, and that is expected: a slider that spanned the whole legal range would be unusable for the values you actually want.
| Control | The slider drags to | You can type up to |
|---|---|---|
| Max Length (px) | 1000 | 8192 |
| Length by Driver (px) | ±500 | ±8192 |
| Max Length Random (px) | 200 | 2000 |
| Amount (px) | ±300 | ±2000 |
| Offset (px) / Offset Random (px) | ±300 | ±2000 |
| Base Height (px) | 200 | 2000 |
| Height by Driver (px) | ±200 | ±2000 |
So if 500 px of Length by Driver is not enough for your footage, type 2000 and it will take it — nothing clamps the value on the way in.
So how do I actually set the length?
- To make every run shorter, cleanly: pull Threshold up, or bring Upper Threshold down to close the selection window from the other side. This cuts on content, so it never produces a repeating edge.
- To halve everything proportionally: Anim Growth at 50%. Keyframe it and the runs grow.
- To cap the length in pixels: switch Limit Length on and set Max Length. Be aware that a fixed cut repeats, which is where the stepped, echoing look comes from — see Clip Instead of Split and Max Length Random below for the two cures.
- To make the length follow the picture's brightness: Length by Driver (px). This is the control most people are actually looking for.
Why is my selection thinner than I expect?
Three separate stages narrow what finally gets sorted, and they live in three different groups. Switch Output Mode to Matte — white is what will be sorted — and check them in this order:
| # | what narrows it | where | the giveaway |
|---|---|---|---|
| 1 | Threshold / Upper Threshold — which pixels qualify at all | Selection | the white area has the wrong shape |
| 2 | Limit Length + Max Length, Break Noise — the run gets chopped | Selection | the white breaks into regular or scattered pieces |
| 3 | Anim Growth — only a fraction of each piece survives | Animation | the white is a thin sliver of the right shape |
Stage 3 is the one that catches people, because Anim Growth sits in a different group and does not look like a size control. At 15% it silently throws away 85% of every run. If your matte is a thin ribbon where you expected a solid area, look there first.
Why does nothing happen here?
(v0.5: if the answer below is "because the runs are one pixel long", the fix now has a name — Shift Mode → Extrude. Sorting cannot do anything to a one-pixel run; Extrude gives it a height instead. That is what Extrude is for, and it is the reason the mode exists.)
Sometimes the matte is exactly right and the picture still looks untouched. That is not a fault — it follows from what sorting is.
Sorting is a permutation. The same pixels, on the same stretch of the same band, in a different order. It never adds material, never moves material past the run's own ends, and never makes one pixel reach further than another. Two consequences catch everyone once:
- A one-pixel run sorts to itself. Scattered bright specks on a dark field give runs one pixel long, and one pixel has only one possible order. The matte is full of white dots and the render is identical to the source. Nothing is broken; there is simply nothing to reorder.
- Content that is already in order sorts to itself. A smooth sky that runs bright at the horizon and dark at the top is already descending along an upward sort direction. Ask for Descending and you get back what you had. Flip Order to Ascending and the same area turns inside out — which is the quickest proof that it was selected all along.
Block Width and Block Height amplify both: blocks sort on their average, and in a smooth area the averages are already ordered too. If a region should be moving and isn't, set both back to 1 before suspecting anything else.
If you want material to travel beyond where it was found, sorting is the wrong tool — that is what Shift Mode is for. Float moves the run bodily (with Fill Mode: Clamp it drags a solid streak behind it), and Stretch lengthens it to run length + Amount × driver. Those two are the only controls in the plugin that can put colour where there was none.
Sorting
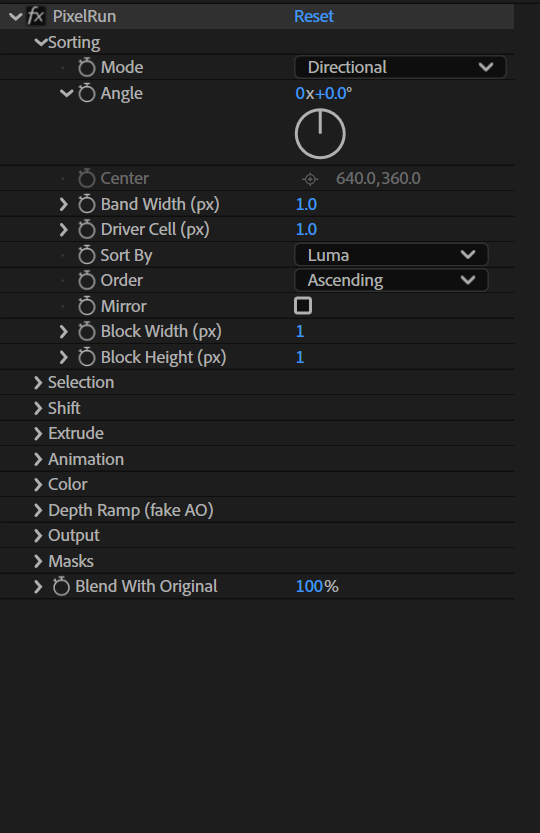
What a band is. The layer is ruled into parallel strips of Band Width (px) pixels. Each strip runs along the sort direction — so with Angle at 0° the bands are vertical columns of the frame, and at 90° they are horizontal rows. The strips are anchored to the layer's own (0,0) corner, so they stay put while you animate everything else.
Lanes. Inside a band, the actual sorting happens on 1-pixel lanes: a band of width 4 contains four parallel one-pixel lines, each sorted separately. What the band contributes is not the sorting — it is the agreement. Every lane in a band uses the same run boundaries, taken from the driver read along the band's centre line. That is what makes the result look like torn ribbons instead of like independent scan-lines: four, eight or thirty neighbouring lanes all start and stop their sort at exactly the same place, so the runs have visible width and a hard, clean end. Band Width (px) 1 — the default since v0.3.1 — is the classic per-row sorter, every line free to disagree with its neighbour. Raise it to 4, 8, 30, 100 and the image tears into ever chunkier slabs.
The one place bands do talk to each other is at their shared edge. A pixel whose square straddles a band boundary gets the exact area-weighted mix of both bands' results — colour, ramp and alpha together — computed analytically rather than by supersampling. That is why band edges stay clean at odd angles instead of stair-stepping.
Mode and Angle. Directional runs every band along the same direction, set by Angle (a rotation dial: 0° = straight up, 90° = right, the same convention as Quadtree's Extrude Angle). Radial (From Center) turns the bands into spokes around Center, and the sort runs along the radius: the run's start is nearer the middle, its end further out. A ring of tone sorted radially fans into a set of graded needles pointing away from the centre.
How wide is a spoke? In Radial mode Band Width (px) is measured at half the layer height — on the circle of radius H/2 — and the plugin picks a whole number of spokes from that (never fewer than four). Every spoke is then that same angular wedge everywhere, which means a spoke is wider than Band Width out at the corners of the frame and narrower than Band Width close to the centre. Very near the centre the wedges become thinner than a pixel, so the band-edge coverage is computed from the two nearest spokes only: a documented approximation that looks like a soft hub, which is very nearly what an exact answer would look like anyway. The exact centre pixel is left alone, having no outward direction.
Center is measured on the layer, not on the comp. Like every After Effects point parameter, Center lives in the layer's own coordinate space, before that layer's Scale, Position and Rotation are applied. On a full-frame, untransformed layer the two coincide and the crosshair sits where you expect. Scale the layer and they part company: drop a 3840×2160 clip into a 512×512 comp at 24% and a Center of (128, 384) lands outside the visible comp altogether, with the spokes fanning out from a point you cannot see. That is normal. Drag the crosshair rather than typing comp coordinates.
Sort By — the key the pixels are ordered on. Luma is the Rec.709 weighted brightness and is what almost every reference pixel-sort uses. Hue is the HSV hue as a 0–1 wheel, with grey counting as 0, so a sorted run becomes a smooth sweep around the colour circle and neutral areas collect at one end. Saturation separates the vivid from the washed-out, which on a portrait tends to pull skin one way and background the other. Red, Green and Blue sort on that channel alone; running the three of them on three copies of a layer and recombining is a cheap, very convincing chromatic tear.
Four more keys arrived in v0.3, and they do not overlap with the first six:
Alpha sorts on the layer's own alpha. On an opaque layer every key is 1, the sort is stable, and the run comes back identical — which is exactly what you want as a sanity check. On a layer with real transparency (a keyed plate, a shape with feathered edges, a precomp of moving mattes) the semi-transparent pixels sort themselves into a graded edge, and combined with Float the transparent parts of a run can be marched out of it.
Minimum and Maximum take the smallest and the largest of the three colour channels. These are the HSV "value" and its dark twin, and they behave very differently from Luma on saturated material: Maximum treats a pure saturated red as bright, where Luma calls it dark. Sorting a neon sign by Maximum keeps the neon at one end regardless of hue; sorting by Minimum ranks pixels by how far they are from being a pure colour, so it collects the washed-out and the white together.
XOR is the deliberately non-photographic one. Each channel is quantised to 8 bits, the three bytes are exclusive-or'd together and divided by 255. Neighbouring colours can land at opposite ends of the key, so the "sorted" run is ordered by a rule the eye cannot follow: it looks scrambled but is perfectly deterministic and still an exact permutation. It is the key to reach for when a sort has become too tidy. The quantisation is the same formula in 8, 16 and 32 bpc, so the result does not change with the project's bit depth.
Order — Ascending puts the lowest key at the start of the run and climbs towards the band's direction; Descending is the mirror of that. On a vertical (Angle 0°) sort, Ascending means dark at the bottom of each run and bright at the top.
Mirror — instead of one climb, the sorted sequence is dealt alternately to the two ends of the run, so it rises from both ends and meets in the middle. With Ascending the brightest pixels end up in the centre of every run and it reads as a ridge or a spine; with Descending the darkest do, and it reads as a trench. This is the "symmetric" pattern, and because it is built from the same sorted sequence it costs nothing extra.
Block Width and Block Height — sorting in tiles instead of pixels
By default the sorter moves single pixels. Block Width (px) and Block Height (lanes) let it move rectangles instead, and the difference in look is large: single-pixel sorting smears, block sorting shuffles.
Block Width (px) (1–64, default 1) is measured along the run. The run is cut into consecutive blocks of that many pixels — the last one is short if the run does not divide evenly — each block is given the average of its pixels' sort keys, and the blocks are sorted by that average. Inside a block the original order is kept, untouched. So Block Width 8 on a 200-pixel run sorts 25 tiles of eight pixels rather than 200 pixels, and the picture inside each tile survives intact: fragments of the original image are re-shuffled along the band instead of being combed into a gradient.
Block Height (lanes) (1–64, default 1) is measured across the band. It groups the band's 1-pixel lanes into strips of that many lanes, and every lane in a group gets the same permutation — so the blocks are genuinely two-dimensional tiles that move as one, rather than a row of independent lines that happen to be similar. The group key is the average over the whole tile: all the lanes of the group, all the samples of the block. Set Block Height to a number larger than the band has lanes and the whole band becomes one group, which is the usual setting: Band Width 16, Block Height 16 gives 16×n tiles.
Block Width 1 and Block Height 1 is the v0.2 pixel sorter, exactly. That is not a limiting case of a general routine, it is a separate path in the code, which is why a v0.2 project renders bit for bit in v0.3.
Everything else keeps working on top: Order still decides which end the low keys go to, Mirror deals the blocks alternately to the two ends, Max Length still caps the run before it is cut into blocks when Limit Length is on, and in Radial mode the "lanes" of a Block Height group are neighbouring angular slices, so the tiles are wedge-shaped and grow towards the frame edge (the wedge taper is subtle at moderate radii). Block sorting is still an exact permutation at 0°, 90°, 180° and 270°: no pixel is duplicated or dropped, even when the last block of a run is short.
Equal keys keep their original order. The sort is stable, deliberately. Two pixels with identical luma come out in the order they went in, which means a perfectly flat run comes back identical rather than scrambled, and the same frame always renders the same way — there is no hidden tie-break to drift between builds or between threads. The same holds for blocks: two tiles with the same average key stay in their original order.
Exactness, and where it stops. At 0°, 90°, 180° and 270° a lane lies exactly on a row or column of pixels, so the sample is the pixel and the whole operation is a true permutation: count the pixels of a sorted run in the output and you get precisely the multiset that was in the input, channel for channel, with nothing interpolated. At every other angle the lane has to be resampled off the pixel grid (bilinearly, once, on the way in), so the run is a faithful but not bit-exact reordering of a resampled line. It looks the same; it simply is not a permutation any more, and that is worth knowing before you build a test around it. On the way out there is never any interpolation: the output takes the nearest entry of the sorted sequence, which is what keeps the steps between sorted pixels hard and crisp instead of smearing them into a gradient.
Blocks, Anim Growth and Cycle all preserve that exactness — they re-order or rotate the same sequence. The three things that legitimately break it are an odd Angle, the Stretch mode (which resamples the run to a new length), and the Output Modes that repeat one pixel along a run.
Selection
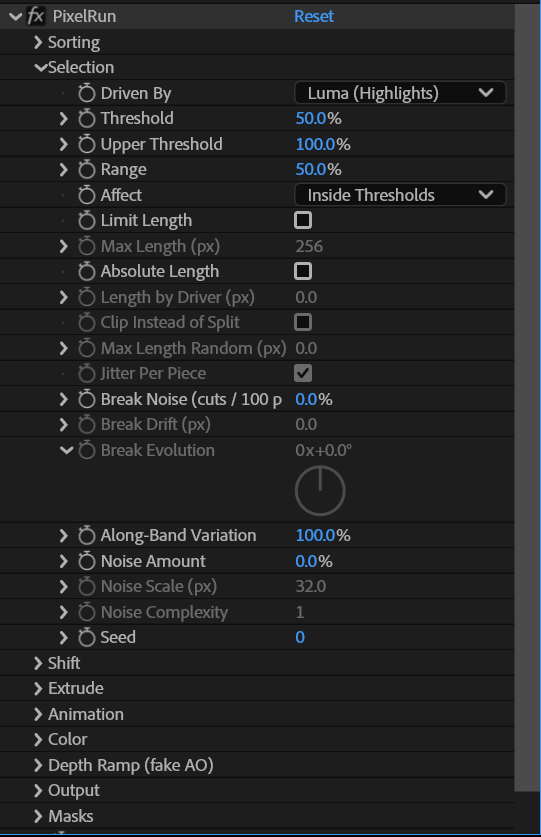
Selection is the half of the effect that decides where sorting happens. Nothing outside a selected run is touched at all.
Driver Cell (px) — the plugin does not read the driver from a single pixel. It reads the average of every pixel inside a Driver Cell × Driver Cell square, on a fixed grid over the layer, with no anti-aliasing between cells: the driver is a field of flat blocks. Driver Cell 1 — the default since v0.3.1 — is pixel-exact and gives nervous, per-pixel run boundaries. Raise it to 4, 8, 16, 32 and the driver becomes progressively chunkier — grain and single stray pixels stop opening runs of their own, and the selection starts to follow the shapes in the picture rather than its texture. This is usually the second thing to touch after Threshold.
Driven By — what the selection listens to. Luma (Highlights) selects the bright parts, Inverted Luma (Shadows) the dark ones, and Noise ignores the picture and selects a deterministic random field instead. The noise does not crawl: the same band and the same position along it always give the same value, and it is quantised by Driver Cell exactly as the luma is, so a bigger Driver Cell gives coarser noise blocks. Noise is the driver to reach for when the footage has no useful contrast of its own, or when you want the sorting to be visibly arbitrary.
v0.3 adds eight more: Alpha, Saturation, Hue, Minimum, Maximum, Red, Green and Blue. They read the same cell average the luma driver does, and they measure exactly what the matching Sort By key measures — so Driven By → Saturation selects the vivid parts of the frame, Hue selects a slice of the colour wheel (with grey at 0, so grey is always at the very bottom of the range), Alpha selects by opacity, and Red / Green / Blue let one channel decide where the sorting happens while another decides how it sorts. There is no "inverted" variant of any of them, and there does not need to be: Affect → Outside Thresholds inverts any driver, so Inverted Luma (Shadows) is the only inverted entry the list still carries, for compatibility.
Threshold, Upper Threshold and Range — the driver's contrast control, and between them the on/off switch of the entire effect. Threshold sets where selection begins; Range sets how much of the remaining scale it takes to go from just-selected to fully selected. A pixel is part of a run as soon as it is above Threshold at all — Range does not widen the selection, it grades it, and that grading is what the Depth Ramp and Float/Stretch amounts read later. Raise Threshold and the runs retreat into the highlights; lower it and they swallow the frame. Range cannot be set to 0 (its minimum is 1%), which keeps the grading well-defined.
☠ A consequence worth knowing: because Range only grades and never moves the boundary, there are settings in which it does nothing you can see. In Sort (in place) mode with Along-Band Variation at 100%, no Depth Ramp and no Offset, nothing in the chain reads the grading — the slider is inert. It comes alive as soon as you switch to Float or Stretch (where it scales Amount), turn on the Depth Ramp, or bring Along-Band Variation below 100% (where the band average feeds back into the selection). If Range appears to do nothing, that is why — and Threshold is the control you actually want.
Upper Threshold (0–100%, default 100%) closes the other end and turns the pair into a window: only drivers between Threshold and Upper Threshold are selected, with the same Range grading falling away at the top edge as it rises at the bottom. Threshold 40 / Upper Threshold 60 sorts the mid-tones and leaves both the shadows and the highlights alone — the one selection a single threshold cannot express. At 100% the upper edge is not evaluated at all (not "evaluated and found to pass"), which is what keeps a v0.2 project bit-identical.
Affect — Inside Thresholds (the default) selects what is in the window; Outside Thresholds selects everything else, the complement. This is the general inverter of the whole selection stage, and it is why the plugin has no "Invert" checkbox: Outside + Luma is Shadows, Outside + a window is "everything but the mid-tones", Outside + Noise is the negative of the same noise field. The grading inverts with it, so a pixel that would have been half-selected inside is half-selected outside too.
☠ The two thresholds behave asymmetrically at their extremes, deliberately:
- Affect = Inside, Threshold 100% selects nothing and short-circuits the entire effect — the original frame comes back bit for bit, no field is built, essentially no cost. This is the plugin's off switch and it is the only setting that gets that treatment.
- Affect = Outside, Threshold 100% is the opposite: everything is selected, the whole frame is one continuous run per band (cut only by Break Noise, or by Max Length if Limit Length is on), and the effect is at its most expensive. If you use Outside as your normal mode, keep in mind that you have given up the cheap off switch — use Blend With Original 0% instead, which is bit-exact too.
Limit Length (v0.3.1) — whether Max Length (px) is allowed to cut runs at all. Off (default): a run is exactly the stretch the selection nominates, from one threshold crossing to the next, whatever its length — a bright sky sorts as one run per band from its lower edge to its upper edge, and the only things that ever end a run are the picture (the driver dropping back out of the window), the frame edge, and Break Noise. This is the ordinary behaviour of a pixel sorter and it produces no edges of its own. On: any run longer than Max Length is cut into pieces of Max Length, and here is the thing to understand before you reach for it: every cut is an edge, and it is a copy of the boundary it was measured from, shifted by Max Length. Cut a run that starts at the bottom of the frame and you get a line at exactly Max Length above the bottom of the frame — dead straight, across every band at once. Cut a run that starts at the lower rim of a bright disc and the lower rim reappears, shifted up, as a "bite" out of the top. That is not a bug in the cutting, it is what a fixed-length cut is; the only cuts that leave no such trace are the ones the picture makes (Upper Threshold, Range) and the ones chance makes (Break Noise). What v0.3.1 does improve when the switch is on: a run that the frame edge cut off at one end is now measured from its content end — the threshold crossing — so its pieces follow the shape of that boundary instead of the frame, and the short remainder sits against the frame where it is least visible. A run bounded by the picture at both ends is still cut from its start, as before; a run with no content boundary at all (a fully selected band, or a Radial spoke selected from the centre to the edge) has nothing to anchor to and is cut from its start.
Max Length (px) — the length of those pieces when Limit Length is on. With the switch off it does not touch the geometry, but it is still the yardstick that Global normalisation and the by Length gradient index measure against, so it still changes the shading of the Depth Ramp and the Gradient Map. It follows the preview resolution, so with Limit Length on, Half and Quarter previews break the runs where Full does.
Length by Driver (px) (new in v0.4) — the missing link: run length in pixels, modulated by the picture. While Limit Length is on, the cap for each run becomes
length = Max Length + Length by Driver × (that run's average driver value)The driver value is the same 0–1 number the Float and Stretch modes use, so with Driven By on Luma a bright run gets the full bonus and a dark one almost none. The parameter is signed: at +60 with Max Length 40 a dark stretch runs about 46 px and a bright one about 94 px; at −30 the bright areas are the short ones. At 0 — the default — the formula collapses to plain Max Length and the render is bit for bit what it was.
This is what turns a mechanical, evenly-chopped field into something that reads as organic: the length now carries the same information as the picture, instead of being a constant.
Clip Instead of Split (new in v0.4) — what happens to the part of a run that does not fit. Off (default): the run is cut into Max Length pieces and every piece is sorted — the v0.3.2 behaviour, bit for bit. On: one Max Length piece is sorted and the rest of the run is left completely alone — not sorted, and given no Depth Ramp, gradient, feather, shift or offset either. It is the original frame, bit for bit.
The difference is the difference between a carpet and a comet. Split fills the whole selected region with sorted material; Clip leaves short, clean streaks sitting on an untouched picture. In a typical frame Clip touches under a tenth of the pixels Split does.
The kept piece sits where Split would have put its first piece: at the start of the run, except where the run is cut off by the frame at its start and by the picture at its end — there it anchors to the picture end, exactly as Split's short-piece rule does. One rule, not two.
Max Length Random (px) (new in v0.4) — scatter on the cutting length, so the cuts stop falling on a regular grid. The effective length is Max Length ± Max Length Random, drawn from the same deterministic hash as everything else (same Seed, same result, every time). At 0 — the default — nothing is evaluated and the render is unchanged.
Jitter Per Piece (new in v0.4) — where that scatter is drawn. On (default): a new length for every piece, so a single long run breaks into pieces of differing lengths and the repeating rhythm is genuinely gone. Off: one length per run — the run is still chopped into a regular grid, only the spacing differs from run to run. That is a rhythmic, banded look which is sometimes exactly what you want, but it does not remove the echo inside a run.
run L = 8, Max Length = 3, Random = 2:
  per RUN    [ p0 p1 ][ p2 p3 ][ p4 p5 ][ p6 p7 ]   regular grid, just a different pitch
  per PIECE  [ p0 p1 ][ p2 p3 p4 p5 ][ p6 p7 ]      broken up
All four of these live under Limit Length — or under Absolute Length, below — and are greyed out while both are off.
Absolute Length — the same length for every run
(new in v0.5) Max Length (px) has always been a ceiling: nothing longer than this. Switch Absolute Length on and it becomes a target instead — every run is shown at exactly that length. A run shorter than the target is stretched up to it (with the same machinery Stretch mode uses, so its content is resampled along its new length); a longer one is cut down to it. The result is a field of even bars whose length you set directly, modulated — if you want — by the picture through Length by Driver (px) and scattered by Max Length Random (px).
The point of the switch is that it does not need Limit Length. Until v0.5 the only way to control run length was to turn cutting on, which brought its cut edges with it; there was no control that simply said "make every run this long". Now there is:
| you want | Limit Length | Absolute Length |
|---|---|---|
| runs as the picture finds them | off | off |
| long runs chopped into pieces, short ones left alone | on | off |
| every run exactly N px, short ones grown to fit | off | on |
| chopped and every piece exactly N px | on | on |
Amount (px) is greyed out in Stretch mode while Absolute Length is on, because the length no longer comes from it. In Float and Extrude modes the switch itself is greyed out: a floating run keeps its own length, and in Extrude the height is the length.
In Spaced Out the switch chooses between the mode's two pictures — off packs every run at its own length (compression), on packs them all at the target (a grid). See Spaced Out — the runs packed end to end.
Where "exactly N px" stops being exact. The target is applied run by run, and neighbouring runs are not moved out of each other's way: where two stretched runs would land on the same pixels, the longer one wins. On isolated runs — a bright streak with dark on either side — you get exactly Max Length every time. On a dense frame, where runs sit end to end, only a minority of them survive at full length; the rest are overpainted by their neighbours. That is the model, not a rounding error. If you want an even field of bars, give them room — a higher Threshold or a narrower Range — rather than a bigger Max Length.
Break Noise (cuts / 100 px) — a second, statistical way of cutting runs. At every Driver Cell boundary along a band the plugin rolls a deterministic hash; if it comes up under the threshold, the run is cut there.
What the number means (changed in v0.5). The slider is now read as cuts per 100 pixels: set it to 3 and a long run is cut about three times every hundred pixels, whatever Driver Cell is. Before v0.5 the number was the probability per cell, which meant the same 3% cut every 33 pixels at Driver Cell 1 and every 133 pixels at Driver Cell 4 — the same slider position doing four different things depending on a control in another group. That is fixed; at the default Driver Cell 1 the arithmetic is identical to v0.4, so only projects that changed Driver Cell and used Break Noise will render differently.
How the Driver Cell still affects it. The dice are rolled at cell boundaries, so Driver Cell is the resolution of the cutting: cuts can only land on a cell boundary, and there can never be more than one cut per cell. Two consequences worth knowing:
- Raise Driver Cell and the cuts get coarser — the same density, but landing on a wider grid, so the pieces come in multiples of the cell. That is usually what you want for chunky, deliberate breaks.
- The slider saturates above 100 ÷ Driver Cell. At Driver Cell 4 the densest possible cutting is 25 per 100 px; ask for more and every cell boundary cuts, the roll stops mattering, and Seed, Break Drift and Break Evolution stop having any effect because there is nothing left to randomise. If your breaks have gone rigid and Seed does nothing, that is why: lower the slider or lower Driver Cell.
At 0 no run is ever cut this way. At the saturation point every run is cut at every cell boundary, so no run survives longer than one Driver Cell. In between you get runs that mostly hold together and occasionally shatter, which is exactly the texture of a real glitch and very hard to get any other way. The roll is fixed and repeatable — the same frame always breaks in the same places, so nothing boils between frames — and Seed is what re-rolls it.
Seed is a discrete re-roll, though: change it and every cut jumps somewhere else at once. v0.3.2 adds two ways to animate the breaks continuously. Both are no-ops at 0, both do nothing while Break Noise is 0%, and neither touches the selection, the Noise driver, Max Length or the sort — they only move the statistical cuts.
Break Drift (px) — slides the grid the breaks are rolled on along the band. Keyframe it and the cuts travel: every break in the frame migrates along its band at the speed you set, the pattern itself unchanged, like a texture scrolling under the runs. It is measured in pixels, follows the preview resolution, and can be negative (the other direction) or very large (it simply keeps going). A drift of exactly one Driver Cell moves every cut by one cell; a drift that is not a whole number of cells also shifts where the cell boundaries fall, so the cuts step rather than glide — Driver Cell 1 makes the steps single pixels.
Break Evolution — the angle dial's cousin of Turbulent Displace's Evolution. Each cell holds two rolls, one for the current Seed and one for the next, plus a private moment of its own at which it switches from the first to the second. At 0 every cell is on the current Seed; at one full revolution (360°) every cell is on the next Seed exactly, bit for bit — so a whole-revolution keyframe pair is the same as animating Seed by one, only continuous; and in between the cuts do not jump but tip over one at a time, in an order fixed by the seed, so at any angle exactly the fraction of cells you would expect has switched. (This is why it is a switch and not a crossfade: averaging two rolls would thin the cuts out to about a third of Break Noise halfway through the revolution and thicken them back — the density of breaks would breathe. It does not.) Keyframe 0° → 360° over a few seconds and the shattering slowly reorganises itself; keep going (720°, 1080°, negative values all work) and it does not repeat. Combine the two — Drift for movement, Evolution for change — and the breaks both travel and churn.
Along-Band Variation — the slider that decides whether the runs follow the picture or the band.
At 100% (the default) the driver is read point by point along the band, so run boundaries land exactly where the picture's own highlights begin and end. This is the ordinary, photographic behaviour of a pixel sorter: the sorting traces the subject.
At 0% the whole band uses a single value — the average of the driver taken along the band's centre line. The band is then selected as a whole or not at all, and the runs are simply the band as one run end to end (or chopped into Max Length pieces with Limit Length on), whatever the picture is doing inside it. The result is graphic and architectural: whole strips of the frame re-sorted end to end, in even blocks, with a hard edge at every band boundary. Bands whose average falls below Threshold are left completely alone, so the frame divides into "sorted strips" and "untouched strips".
☠ In Extrude, this is the first control to check when nothing seems to happen. At 0% every pixel of a band shares one driver value, so every column in that band is the same height: a flat slab, not a skyline. And on a sparse or fine-grained frame that single band average is small enough that the height rounds down to one pixel — and a one-pixel column paints its own pixel where it already was, so the output is the input, bit for bit. Extrude wants Along-Band Variation at 100%; that is where the skyline comes from.
Everything between is a genuine blend of the two values, not a crossfade of two renders. 30% gives runs that still respect the picture but have started to square themselves off; keyframe it from 100 to 0 and the sorting visibly hardens from smear into stripe.
The noise field — Noise Amount, Noise Scale, Noise Complexity
Break Noise cuts runs. The noise field does something different and often more useful: it modulates the threshold across the frame, so the same picture qualifies in some places and not in others. It is added to the driver value before the thresholds are applied, and it works with every driver — including the Noise driver, where it acts as a second, smoother layer on top of the blocky one.
Noise Amount (0–100%, default 0) is how far the field can push the driver, up or down. At 0 the field is not evaluated at all. At 20–30% the run boundaries stop tracking the picture exactly and start to wander: patches of the frame sort where the tone alone would not have qualified, and bright patches elsewhere are passed over. At 100% the picture barely decides anything any more.
Noise Scale (px) (1–1000, default 32) is the size of one blob of the field, in layer pixels — so it follows the preview resolution like Band Width does. Small values give a speckled, per-detail selection; 100–300 gives large soft regions that read as "the effect is stronger over here", which is the usual reason to reach for this control.
Noise Complexity (1–4, default 1) is how many octaves are summed, each half the size and half the weight of the last. 1 is a single smooth lattice; 4 is a proper fractal field with detail at four scales. Complexity is the parameter that costs render time — each octave is another set of lattice lookups per driver sample — so raise it only when you can see it.
The field is value noise, built from a deterministic hash: it does not crawl, does not depend on the frame number, and renders identically on every machine and in every bit depth. Animating it means keyframing Noise Scale or Seed, or moving the layer under it.
Seed (0–99999, default 0) re-rolls everything random in the effect at once: the Noise driver, the Break Noise cut points, the noise field, and Offset Random. It is the control to reach for when a composition is almost right but one run is in the wrong place — change the Seed rather than fighting the thresholds. Keyframing it with a Hold interpolation gives a hard per-frame reshuffle; keyframing it linearly does not do what you want, because neighbouring seeds are not neighbouring patterns.
Shift
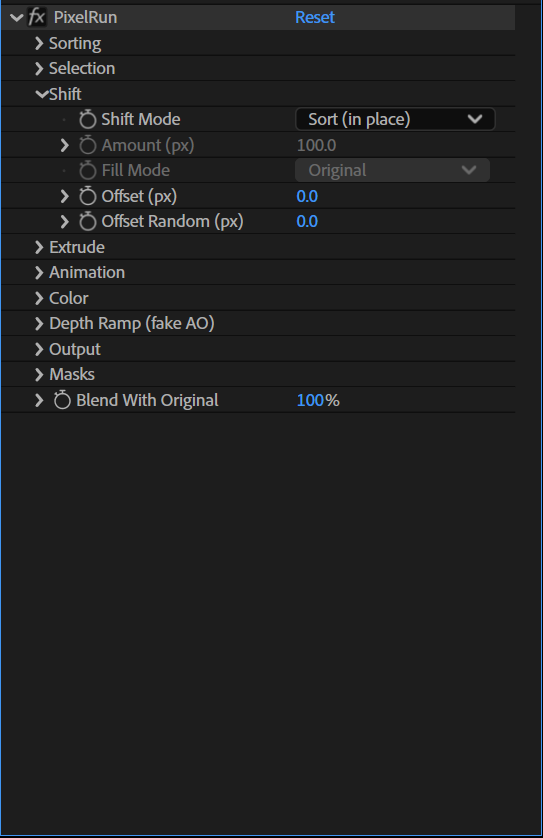
By default a sorted run stays exactly where it was found. Shift Mode offers four ways of letting it leave: Float slides it, Stretch lengthens it, Extrude grows a column out of every pixel (its own chapter, below), and Spaced Out packs them all against the start of the band.
Sort (in place) — the run is re-ordered and nothing moves. Amount (px) and Fill Mode have no effect whatsoever in this mode; the panel leaves them enabled because they are keyframable, but the render ignores them. (Offset is the exception — see below.)
Float — after sorting, the whole run slides along the band by Amount (px) multiplied by the run's own average driver value. A fully-driven run travels the whole Amount, a half-driven one travels half as far, and Amount may be negative to send them the other way. Because the distance is per-run, the runs separate from one another and the frame appears to delaminate. Where a floated run lands on top of a stationary picture it covers it, and where two floated runs overlap, the one that travelled further wins — so the material that has come a long way passes in front of material that has barely moved, and the image stays readable at large Amounts instead of dissolving. What appears in the space the run vacated is Fill Mode's business.
Stretch — after sorting, the run is not moved but lengthened: a run of L pixels is resampled to L plus Amount × its average driver value, taking the nearest entry of the sorted sequence as it goes. Nothing is vacated, so Fill Mode never comes into play; the extra length simply covers whatever lay ahead of it, and where two stretched runs collide the longer one wins. This is the mode that produces the long vertical curtain look — sorted tone drawn out into ribbons that hang over the rest of the picture — and it is a good deal more controllable than Float because it cannot open holes.
Fill Mode (Float and Spaced Out) decides what appears where a floated run used to be — and, in Spaced Out, what fills the end of the band the packed sequence did not reach. Original — the untouched original pixels show through, so the run reads as a sheet sliding over the picture and there are no holes anywhere. Transparent — the vacated area becomes genuinely transparent (straight alpha, as After Effects expects), so whatever is underneath in the comp shows through and the runs can be glowed or offset on their own. Wrap — the source coordinate wraps to the opposite edge of the layer, so the picture is a torus and content re-enters from the far side. Clamp — the pixel at the run's departing end is repeated behind it, smearing a single tone into a long uniform bar. All four cost the same; the choice is purely a look.
Offset and Offset Random — moving runs without a driver
Amount moves each run by how strongly it is selected. Offset (px) (−2000…2000, default 0) moves every run by the same distance, driver or no driver, and Offset Random (px) (0…2000, default 0) adds a per-run random amount on top, evenly spread between −Offset Random and +Offset Random. A run's total displacement is therefore Amount × driver ± Offset ± Offset Random, and the two new controls are the way to get motion out of a flat driver, where Amount does nothing at all.
The randomisation is per run and deterministic: the same run in the same frame always draws the same number, so nothing flickers, and Seed re-rolls the whole set. Offset Random is what turns an even curtain into scattered debris — Limit Length on with a small Max Length, plus a large Offset Random, is the recipe for particles rather than ribbons.
☠ Offset works in Sort (in place) mode too, and that changes what that mode is. If Shift Mode is Sort and either Offset or Offset Random is non-zero, the run genuinely moves, so the effect switches internally to the Float machinery with Amount forced to 0 — the run slides by the Offset alone. Two consequences, both intended:
- Fill Mode becomes live in Sort mode. If you set an Offset and holes appear, that is Transparent fill doing its job; set Fill Mode to Original.
- Amount stays dead in Sort mode. It is not partially honoured; it is zero.
Set both Offset controls back to 0 and Sort is exactly the in-place sorter it was, bit for bit. In Float mode the Offset is simply added to the driven distance; in Stretch mode it moves the stretched run's starting point without changing its length.
Spaced Out — the runs packed end to end
site/imgs/pixelrun/spaced-out.pngdrop the file in with this name and it appears here(new in v0.7) Every mode so far puts each run back where it was found. Spaced Out is the fifth Shift Mode and it gives that up: the selected runs of a band are taken in order and laid down one after another, starting at the beginning of the band, with no gaps between them. The first run starts at the band's first pixel, the second starts where the first ended, and so on to the end of the band.
one 12 px band, four selected runs

source     [A A A] . . [B B] . [C C C] . [D]
Sort        A A A  . .  B B  .  C C C  .  D      <- everything stays put
Spaced Out  A A A B B C C C D  ? ? ?             <- packed; "?" is Fill Mode
☠☠ This is the first mode in PixelRun that does not leave the unselected pixels alone. The dots in that drawing — the pixels between the runs, the ones the selection rejected — are not pushed aside and they do not reappear further along. They are gone. Everywhere else in this plugin the rule is "outside the runs the frame is untouched, bit for bit"; here it is not, and that is the entire point of the mode. If you want the selected material collected together and the rest of the picture discarded, this is the control. If you want the frame preserved, use Float.
What it is good for. Float and Stretch both leave the runs where the picture put them, so a sparse selection stays sparse. Spaced Out collects it: a thin scatter of highlights becomes a solid block of highlights at the top of every band, and the length of that block is a direct read-out of how much of the band was selected. Raise Threshold and the block shrinks; the picture behaves like a bar chart of its own selection.
The four things to know
1 — Absolute Length decides between compression and a grid. Spaced Out does not touch the length of a run; it only decides where the run goes. So the existing switch does the rest:
| Absolute Length off | Absolute Length on | |
|---|---|---|
| each run is shown | at its own length | at the target length (Max Length) |
| the picture reads as | compression — the selected material squeezed together, gaps closed | a grid — every run the same size, evenly spaced |
Off is the honest one: nothing is resampled, every selected pixel appears exactly once, and the packed block is exactly as long as the selection was. On turns the same runs into a regular ruler of bars, and Length by Driver (px) and Max Length Random (px) modulate it as usual.
2 — The packing is per band, so the picture shears. Each band packs its own runs and knows nothing about its neighbours, so two adjacent bands almost never shift by the same amount. The result is a band-by-band shear — at Band Width 1 that is row by row, which reads as a hard horizontal (or angled) tearing. This is the most visible difference between Spaced Out and the other modes, and it is not a bug: it is what "each band compressed independently" looks like. Widen Band Width and the shear gets chunkier and calmer; that is the control for it.
3 — Which end is "the start" is set by Angle. The sequence packs toward the beginning of the band, and which end that is comes from Angle, exactly as it does for Offset and Growth From. Measured, on the four exact axes:
| Angle | bands run | the sequence packs to the |
|---|---|---|
| 0° | vertically, as columns | bottom |
| 90° | horizontally, as rows | left |
| 180° | vertically | top |
| 270° | horizontally | right |
Rotate by 180° and everything packs to the other side; in between, the block hugs whichever edge the band reaches first. In Radial mode the bands are spokes and they pack toward the centre — and there is no way to pack outwards, because Angle is greyed out in Radial mode.
☠ Radial is the one place where "every selected pixel appears exactly once" stops being literally true. In Directional mode the packed block holds precisely the selected pixels, no more and no fewer — that is what makes Absolute Length off a lossless compression. Spokes, however, converge: close to the centre, neighbouring spokes land on the same pixels, so the polar grid swallows part of the material. Measured on a pattern of concentric rings, the selection covers 65 240 pixels before packing and 17 744 after. Nothing is lost from any one spoke — the spokes simply overlap once they arrive. Expect a solid disc, not a shrunken copy of the rings.
4 — What happens at the far end. Two cases, and both are simple:
- The sequence is shorter than the band (always true with Absolute Length off, and usually true with it on). The rest of the band is filled by Fill Mode — see below.
- The sequence is longer than the band (only possible with Absolute Length on: twenty runs asking for 40 px each need 800 px). It is cut at the band's edge. The run that straddles the edge is drawn as far as it fits and its tail is lost; it is not dropped, and nothing is put back in its place. Every other mode in the plugin cuts the end of the band the same way — and the alternative would jump on a keyframed Max Length, where one pixel of change would pop a whole run in or out of the frame. Here that same pixel just shortens the last visible run by one.
Fill Mode in this mode
Where the packed sequence stops short of the end of the band, Fill Mode decides what is drawn in the remainder. It is greyed out in Stretch and dead in plain Sort; here it is live, and here Wrap and Clamp refer to the packed sequence itself, not to the original picture:
| what fills the tail of the band | |
|---|---|
| Original | the untouched original pixels, so the compressed material sits on top of the frame it came from and there are no holes. The default, and the safe one. |
| Transparent | a genuine hole (straight alpha) — the band ends where the material ends, and the comp shows through. This is the setting that makes the "bar chart of the selection" read cleanly. |
| Clamp | the last pixel of the sequence repeated to the end of the band — one tone smeared into a long bar. |
| Wrap | the packed sequence tiled: it starts over from its own first pixel and repeats until the band is full. A short selection becomes a repeating pattern across the whole band. |
☠ Wrap and Clamp read the sequence, so they carry the sorted, compressed material — not the untouched frame. If you expected the original picture to wrap around the layer the way it does in Float, that is Original you want.
☠ One case worth expecting: a band with nothing selected in it at all. Its sequence is empty, so the whole band is remainder and Fill Mode takes all of it — with Transparent that band goes completely empty, and with Wrap or Clamp there is nothing to repeat, so it falls back to the original pixels. That is the consistent answer (a band that selected nothing has a zero-length bar), but it is worth knowing before you see a photograph lose whole rows: on a 720-row frame, a Threshold of 92% with a narrow Range empties 708 of its 720 rows.
What is greyed out, and why
Amount (px), Offset (px) and Offset Random (px) are all disabled in Spaced Out. The position of every run is decided by the running cursor — first run at the start of the band, each next one against the back of the last — so there is nothing left for a displacement control to do. Fill Mode and Absolute Length are both live, as above.
☠ One reassuring edge case. If every pixel of a band is selected, that band holds a single run covering the whole band, so packing it against the start puts it exactly back where it was: with a full selection Spaced Out is bit for bit the classic Sort. The mode only starts to differ once the selection has gaps — which is the same as saying that everything it does, it does with the gaps.
Extrude — height instead of order
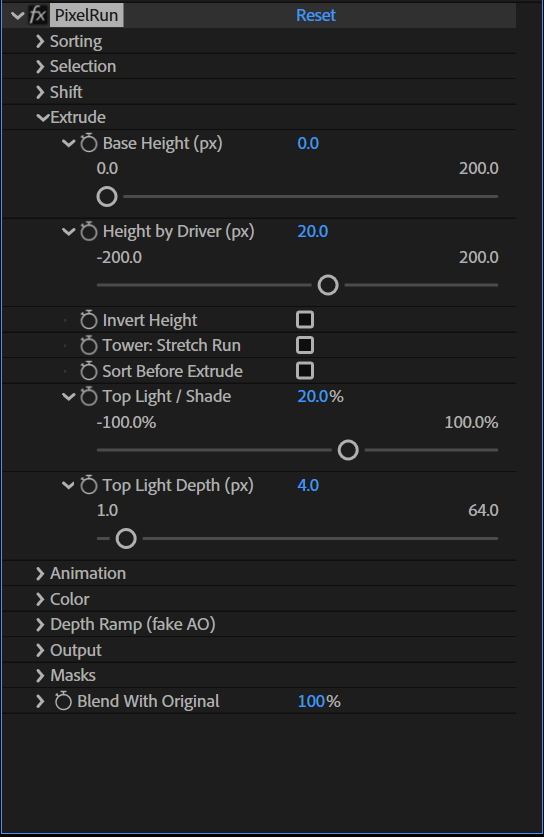
(new in v0.5) Everything else in this plugin re-orders pixels or moves runs. Extrude does neither. Choose Shift Mode → Extrude and each selected pixel grows into a column along the band, as long as its own driver value says:
height = Base Height (px) + Height by Driver (px) x that pixel's driver valueand the column occupies the pixels from where it stands to height − 1 further along. The pixel in front — the one nearer the start of the band — wins wherever the two overlap, but only up to its own height; above that, the taller column standing behind it shows through. Four pixels of brightness 232, 250, 238, 244 therefore do not become four equal bars; they become a skyline, and the shape of the skyline is the picture itself.
Why this is not sorting, and why it needed a mode of its own. Sorting is a permutation: the same pixels, the same stretch, a different order. No pixel can end up higher than another, and a run one pixel long comes out exactly as it went in. If you have ever pointed PixelRun at a clean sky or a fine-grained picture and watched nothing happen, that is why. Extrude does not permute — it copies — so it works on runs of any length, one pixel included.
It is a picture, not geometry. "Extrude" here is a figure of speech for a 2D height field. There is no mesh, no camera, no depth buffer you can light or rotate; the occlusion is a painter's rule resolved along the band, and the output is the same raster as every other mode, with the same determinism.
Base Height (px) — the part of the height that owes nothing to the picture. At 0 (the default) a pixel with no driver value contributes nothing at all: it does not even paint itself, so the original frame shows through. Raise it and every selected pixel gets at least this much, which reads as a solid slab with the picture drawn on top of it.
Height by Driver (px) — the part the picture decides, and the control that draws the skyline. It defaults to 20 px so that switching to Extrude shows you something immediately. Leave it positive and the bright pixels are the tall ones; to invert the skyline, use Invert Height below rather than a negative number here.
It is still signed, and the sign is only useful in combination with Base Height: a negative value on its own has nothing to subtract from, so with Base Height at 0 every column comes out empty and the frame is returned untouched, bit for bit. Base Height 40 px with Height by Driver −40 px is the long way round to what Invert Height now does in one click.
Invert Height — off by default. On, the height reads the driver backwards: within the selection the dark pixels become the tall ones and the bright ones sink into the picture. Leave Height by Driver positive and simply tick this. It is exactly equivalent to setting Base Height to the same number and Height by Driver to its negative — the same skyline, one control instead of two — and it only touches the height. Where the runs are, how they are cut and how the Depth Ramp shades them are all unchanged.
☠ Note what "dark" means here: the driver is inverted inside the selection you already made. Pixels the Threshold never selected have no column either way. To make the shadows the subject of the whole effect, that is still Driven By → Inverted Luma (Shadows), or Affect → Outside; Invert Height flips the skyline, not the selection.
Sort Before Extrude — off by default. Off, each column carries its own pixel's colour, and the whole sorting stage is skipped (which also saves memory). On, the run is sorted first and the column grows from the sorted pixel that ends up in that position. The skyline does not change either way — the height always comes from the driver at that position, not from whatever colour lands there — so this switch changes the colours on the towers and nothing else.
Tower: Stretch Run — off by default: a column is one colour, its own source pixel repeated, so "everything comes from the picture" holds literally. On, the column shows the whole run's content stretched along its height, which gives each tower a gradient façade instead of a flat one. On a one-pixel run the two are identical.
Top Light / Shade and Top Light Depth (px) — a brightening or a darkening that runs up the last few pixels of each column, the way a sunlit roof reads against a shaded wall — or a shaded roof against a lit one. The strength is signed: positive lights the roof, negative shades it, and 0 (the default) costs nothing and changes nothing. Top Light Depth is how far down from the top it fades in — 1 px gives a hard cap, 8–20 px a soft one — and it applies to both signs. At −100% the very top pixel of each column goes to black; the slider runs to +100% but accepts up to +300% typed in, for a blown-out roof.
It is applied after the Depth Ramp, so the two stack: Depth Ramp darkens the foot of the tower, Top Light / Shade decides what the crown does. A negative Top Light with the Depth Ramp on is the quickest way to a skyline read against the light instead of into it.
What still works, unchanged, on the towers. Everything that reads a position along a run now reads a position along the column, which is exactly what you want:
- Depth Ramp (fake AO) shades each façade from its base to its top — the tower gets darker at the foot and lighter at the crown, which is what makes the city read as depth rather than as stripes. This is the same Root Darkening / Tip Brightening pair, and Normalize still chooses between per-tower (each tower uses its full height) and Global (all towers measured against Max Length, so short ones stay dark).
- Gradient Map → by Position maps the colour ramp up the height of each tower; by Length gives every tower one colour according to how tall it is.
- Feather Start / End (px) softens the foot and the crown of each column.
- Output Mode, Preserve Alpha, Blend With Original, masks and the band-edge anti-aliasing all behave as they do everywhere else.
What is greyed out in Extrude, and why. Amount (px), Fill Mode, Offset and Offset Random all describe a run moving, and in Extrude nothing moves — a column grows from where its pixel already is. Absolute Length is greyed out for the same reason: the height is the length here.
The selection still decides everything. Columns grow only from pixels that are inside a run — above Threshold, inside the mask, within the length limits — and everything else is left exactly as it was. Set both height controls to 0 and the output is the original frame, bit for bit.
Recipe — the aerial city. Threshold low enough that most of the frame is selected, Angle 90° so the towers grow sideways (or 0° for upwards), Height by Driver 40–80 px, Depth Ramp on at 60–100% with Root Darkening high, Top Light 40% at 3–6 px depth, and Along-Band Variation at 100% so every pixel keeps its own height. Then keyframe Height by Driver from 0 and the city grows out of the photograph.
Animation
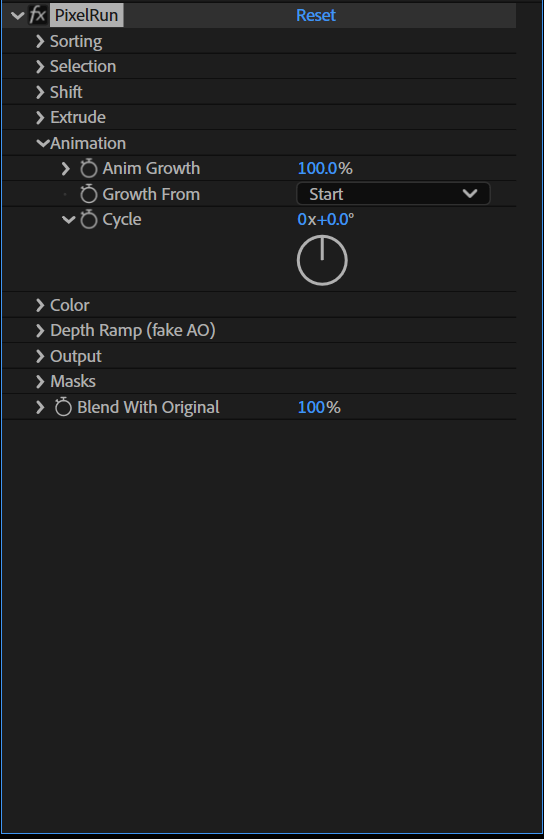
Two controls, both of them ordinary keyframable parameters, that make a still frame move without touching the footage. Neither reads the time: keyframe them and the plugin renders and caches each value like any other setting.
Anim Growth (0–100%, default 100%) decides how much of each run actually sorts. Instead of the whole run, only a window of the first Growth × length pixels takes part — and that window is not a fade or a mask, it is the run. The shortened run is the run for every other purpose in the plugin: the Depth Ramp measures it, the by Position and by Length gradients index it, Feather feathers its two ends, Float floats it, Stretch stretches it, and Output Mode reads its first and last pixel. Everything outside the window is left bit for bit as it was.
☠ Because of that last sentence, Anim Growth is also the most common reason a selection looks thinner than expected — and it is two groups away from where you would look. See Why is my selection thinner than I expect? near the top of this guide.
At 100% (the default) the window is the whole run and nothing changes. At 0% every window is empty, every run is dropped, and the frame comes back bit for bit the original — which makes a 0 → 100% keyframe a clean "the sorting grows in" transition with no cross-fade anywhere. At 50% each run sorts its first half; a 200-pixel run sorts 100 pixels, a 7-pixel run sorts 4 (the length is rounded, not truncated).
Growth From chooses which end the window grows from: Start (the default) anchors it at the run's beginning — the end the sort direction points away from — and End anchors it at the far end, so the sorting eats backwards into the run. On a vertical Angle 0° sort, Start grows upward from the bottom of each run and End grows downward from the top. With Growth at 100% the two are identical.
Because runs have different lengths, a single Growth keyframe makes short runs finish early and long runs still be growing — the frame fills in organically rather than as a wipe. If you want a wipe, animate Threshold instead.
Cycle (an angle dial, default 0°, not limited to one turn) rotates the sorted sequence inside its run. The pixels do not leave the run and nothing is added or lost: the sequence is simply read from a different starting point, wrapping around the end. 90° rolls it a quarter of the way along, 180° half way, and 360° returns it exactly where it started — bit for bit. Negative angles roll it the other way. Because the sequence wraps rather than slides, no hole ever opens. Multiple turns work as you expect — 0° → 1080° is three loops, whether the dial is scrubbed, keyframed or typed (measured in After Effects: 0°, 360°, 720° and 1080° render byte-for-byte identically).
The loop recipe. Turn Mirror on, put a keyframe on Cycle at 0° and another at 360° at the end of the shot, and set both to Linear. The result is a seamless loop: the sorted material walks continuously along every run and the last frame joins the first exactly, with no crossfade, no dissolve and no repeated frame. Mirror is what makes it read as flow rather than as a conveyor belt, because the sequence is symmetrical about the run's centre. For a faster flow, keep the shot length and use more turns: 0° → 1080° is three loops in the same time.
A practical caveat: the rotation is a whole number of pixels, computed from the run's own length, so on short runs a small Cycle rounds to nothing. A 10-pixel run only has ten distinct positions — the sequence jumps every 36°. Long runs move smoothly; a frame full of 20-pixel runs will visibly step. Let the runs be long (Limit Length off, or a larger Max Length), or accept the stepping as the look.
Cycle applies to the sequence, so it works in every Shift Mode, with Blocks (whole blocks rotate), and under Growth (the rotation is measured on the window, not the original run).
Color
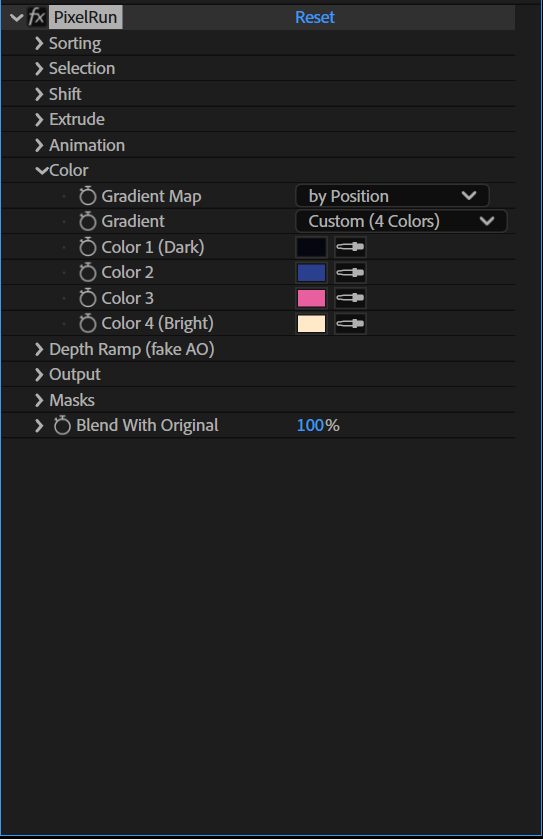
Gradient Map replaces the colour of the sorted runs with a lookup from a gradient — the same gradient engine, the same ten presets and the same four custom colour wells as Quadtree, so a project can carry one palette across both effects. Pixels outside the runs keep their own colour in every mode, which is what makes the gradient read as a highlighter on the sorting rather than as a treatment of the whole frame.
Off — the runs keep their own colours.
by Position — the index is how far along its own run the pixel sits, from 0 at the start to 1 at the end. Every run therefore carries the full gradient from end to end, and the sorting becomes a set of coloured ribbons whose direction you can read at a glance. Use this to see what the effect is doing: it draws the run structure itself, and with a good gradient it looks like a data visualisation rather than a diagnostic.
☠ by Position shares its index with the Depth Ramp. The same R drives both, so the Depth Ramp's Normalize setting also decides how by Position is measured: at Per Streak the palette spans each run, at Global it spans Max Length (px) instead — and a run much shorter than Max Length then only reaches the first fraction of the gradient. If a by-Position gradient looks compressed, check Normalize.
by Luma — the index is the brightness of the sorted pixel. A straightforward gradient map, except that because the pixels have been sorted the gradient comes out in order: each run is a clean sweep through the palette.
by Length — the index is the run's own length as a fraction of Max Length (px). ☠ This is the one index that is constant along the run: every pixel of a run gets the same colour, so it is a map of how long the runs are, not a gradient running through them. Short runs land at one end of the palette, full-length ones at the other. On busy footage this is the quickest way to find out whether Threshold and Max Length are set where you think they are — but if you wanted colour to travel along each streak, you want by Position, not by Length.
☠ Note also that Max Length is the yardstick here even when Limit Length is off. If your runs are all much longer than Max Length they all clamp to the bright end and the frame comes out one flat colour; raise Max Length until the map spreads out.
Gradient, with Color 1 (Dark), Color 2, Color 3 and Color 4 (Bright) — the lookup itself. Custom (4 Colors) interpolates through the four wells, dark to bright; the presets (Rainbow, Nightlight, Fire, Ice, Sunset, Neon, Thermal, Ocean, Grayscale) ignore the wells.
The Depth Ramp, if it is on, shades the gradient result as well — the two stack, they do not fight. There are two exceptions, both of which replace the picture rather than treating it: Depth Ramp Only and Output Mode → Matte have no gradient at all.
Two notes on the v0.3 controls. Anim Growth shortens the run before the gradient is indexed, so by Position runs the full palette across the window and by Length reports the window's length — which makes a Growth keyframe visible as a colour change as well as a geometric one. And the Stretch First / Last Pixel output modes run before the gradient, so a run whose colour has been flattened to one pixel can still carry a by Position gradient sweep and a Depth Ramp along its length.
Depth Ramp (fake AO)
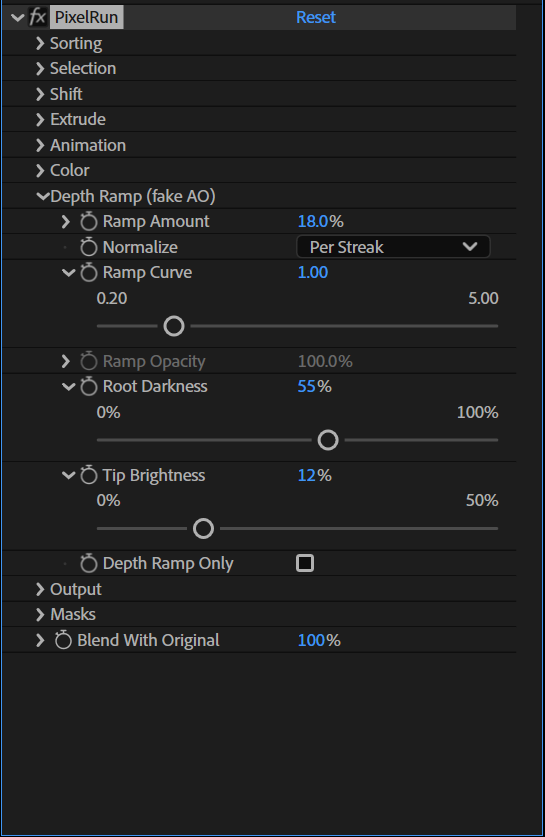
This group turns flat sorted runs into solid matter, at no geometric cost. Each output pixel knows how far along its own run it sits; the Depth Ramp converts that position into a shading multiplier — dark at the start of the run, slightly brighter towards the end. Because the position comes out of the same table, with the same band-edge coverage, as the colour does, the shading is registered to the picture pixel for pixel: it cannot slide off its run.
Ramp Amount — how strongly the shading is burnt into the picture. 0 is a true no-op, and that is the default: an untouched project renders exactly as it would with the whole group closed. Ground — everything outside a run — is never shaded at all, in any mode.
Normalize — what "the length of the run" is measured against, and the answer changes the look completely.
Per Streak — each run is normalised to its own length. Every run, long or short, walks the full ramp from dark start to bright end. Uniform, graphic, legible.
Global — every run is measured against the same yardstick, Max Length (px). A run that is only a quarter of Max Length therefore only reaches a quarter of the way up the ramp and stays dark along its whole length. Short runs read as recessed, long ones as raised, and the frame gains a real depth ordering rather than a per-run one. This is the mode for "sculpted" looks; Per Streak is the mode for "graphic" ones. The yardstick is the parameter and not the longest run in the frame, deliberately: it does not depend on what is in the picture, so a shot cannot flicker in brightness as its content changes.
Ramp Curve — bends the ramp. Below 1 the darkness clings to the start of the run and most of its length stays bright; above 1 the darkness spreads and only the very end lifts.
Root Darkness and Tip Brightness — the two ends of the shading, with the same meaning and the same defaults as Quadtree's Side Shading and Top Light. Root Darkness is what sells the depth; Tip Brightness is a small lift that keeps the ends of runs from looking flat.
In Float and Stretch modes the ramp follows the run to where it actually ended up: it is measured along the floated or stretched result, not along the place the run was found, so the shading travels with the ribbon and a stretched run's ramp is stretched with it. Under Anim Growth it is measured along the window — so a growing run's ramp grows with it and always reaches its bright end.
Depth Ramp Only — the map mode
Depth Ramp Only does not shade the picture; it replaces it with a greyscale depth map of the sorting. Every pixel is painted with its own position along its run — black at the start, white at the end — and everything outside a run is black. Alpha is the layer's own alpha scaled by Ramp Opacity, written straight, and the values are not clamped, so in a 32-bpc comp the pass survives grading and glows intact. Root Darkness, Tip Brightness and Gradient Map have no effect here at all: this is a measurement, not a look.
What the map is measuring depends on Normalize, and this is the whole reason the mode exists. Under Per Streak every run runs black to white over its own length, so the map is a direction indicator: it tells you, run by run, which way the sort is pointing and where the boundaries fell, and short runs are just as legible as long ones. Under Global the same map is scaled by Max Length (px) instead, so a run's brightness now reports its length — short runs never leave the dark end, only a run at the full Max Length reaches white — and the frame becomes a readable chart of where the long runs are.
The pass is meant to be used, not merely inspected. Feed it to a Displacement Map, a Set Matte or a Levels-driven key and you have a mask that follows the sorting exactly, without having to guess at it; duplicate the layer with identical settings, set the top copy to Depth Ramp Only, and you can grade, blur, tint or delay the depth pass independently of the picture it belongs to. Ramp Opacity dials the whole pass back and does nothing whatsoever in any other mode.
☠ Output Mode → Matte overrides Depth Ramp Only. If you want the depth map, leave Output Mode on Sorted Pixels; if you want the flat white-on-black matte, the depth map is not computed at all. The two are different pictures of the same runs — one graded, one binary — and the Matte wins.
Changed in v0.2: in the withdrawn v0.1 model Depth Ramp Only emitted a shading pass designed to be composited back with Multiply. It no longer does. It is a straight depth map now, and multiplying it over the un-ramped render will not reproduce the ramped one.
Output
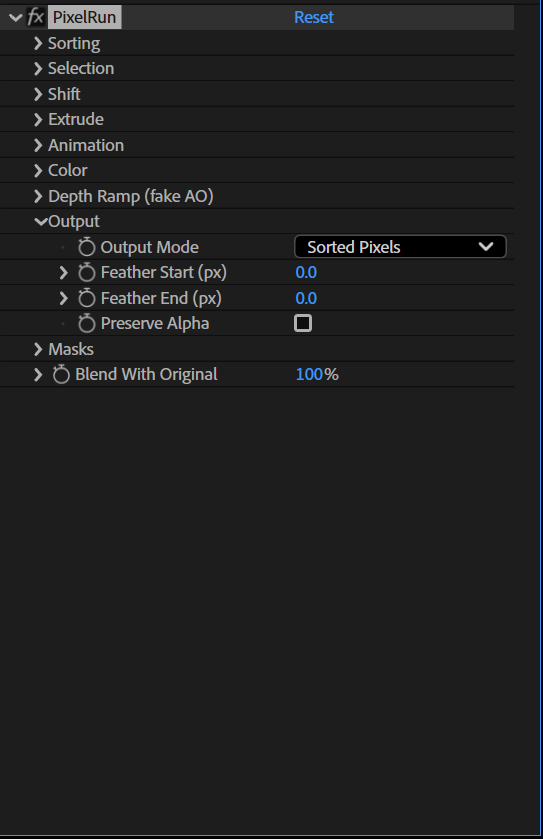
The last thing the effect does to a run before it is composited back. Everything in this group is a no-op at its default.
Output Mode — what the run's pixels actually are.
Sorted Pixels (the default) is the sorter as described everywhere above: the run holds its own pixels, re-ordered.
Stretch First Pixel replaces the whole run with one colour — the first entry of its sorted sequence, repeated from end to end. With Ascending order that is the run's darkest pixel (or lowest key, whatever the key is); with Descending it is the brightest. The frame becomes a field of flat bars whose colour is a genuine statistic of the material that was there, which is a much better-looking flat than any average would be: it is a real pixel from the picture. Stretch Last Pixel does the same with the other end of the sequence.
These two modes act before the Gradient Map and the Depth Ramp, so a flattened run can still be gradient-mapped by Position and shaded by the ramp — that is how you get a bar that is one hue but not one value. They do not touch what a Float run leaves behind: the fill is the fill.
Matte throws the picture away and returns a binary map of the selection: white (1,1,1) everywhere a run is, black (0,0,0) everywhere else — including the ground and including the hole a Transparent fill has opened. Alpha is the layer's original alpha, straight. Gradient Map, Depth Ramp and Depth Ramp Only are all skipped. This is the matte to feed a Set Matte, a Track Matte or a luma key when you want to treat the sorted areas separately: unlike the depth map it has no gradient in it at all, so a key on it has nothing to slip on. Feather (below) is the one thing that does modify it, and it turns the hard edge into a soft one.
Feather Start (px) and Feather End (px) (0–500, default 0) fade each run back into the untouched picture at its two ends. Feather Start 8 makes the first 8 pixels of every run ramp from "the original frame" to "the full effect"; Feather End does the same at the far end.
Changed in v0.4: Feather now also softens the hole that Fill Mode = Transparent leaves behind in Float mode. Up to v0.3.2 only the run that floated away had soft ends; the hole it vacated kept a hard cut-out edge, which read as a sticker peeled off the frame. Now the hole's rim fades back into the original picture over the same distance, so the transparency arrives gradually. Preserve Alpha still wins: switch it on and the original alpha is restored over the whole hole, feathered or not. With both Feather values at 0 nothing is evaluated and the result is unchanged. Both are measured on the run as it is displayed — after Growth has shortened it, after Float has moved it, along its stretched length in Stretch mode — so the fade always sits on the visible ends. They are measured in layer pixels and follow the preview resolution.
The feather is a straight blend of the finished pixel back towards what was underneath, across all four channels, so it softens colour, gradient, ramp shading and alpha together: a Transparent Float run gets a soft alpha edge instead of a cut one. In Depth Ramp Only and Matte there is no "underneath" to return to, so the feather fades towards the mode's own ground instead — black — which is exactly what makes Matte + Feather a usable soft-edged matte.
At 0 the feather is not evaluated. It is the cheapest way to stop a sorting effect from looking stuck on, and 4–12 px is usually enough.
Preserve Alpha (default off) — when on, every output pixel's alpha is the original layer's alpha at that position. The colour is whatever the effect produced; only the transparency is put back.
Use it when the sorting is happening inside an already-keyed or masked layer and you do not want the runs to carry the matte around with them: sorted colour, original shape.
☠ Preserve Alpha wins over everything, including the Transparent fill. Turn it on in Float + Transparent and the vacated areas are no longer holes — they keep the layer's own alpha, and since their colour is zero they come back as black, not as transparency (to be confirmed in AE test). That is the intended behaviour and not a bug; if you want holes, leave Preserve Alpha off. It also overrides Ramp Opacity's effect on the depth map's alpha, and it applies in Matte mode (where the alpha was already the original, so nothing changes).
It runs before Blend With Original, which mixes alpha as well — but since both sides of that mix now carry the original alpha, the alpha survives the blend intact at any Blend value.
Masks
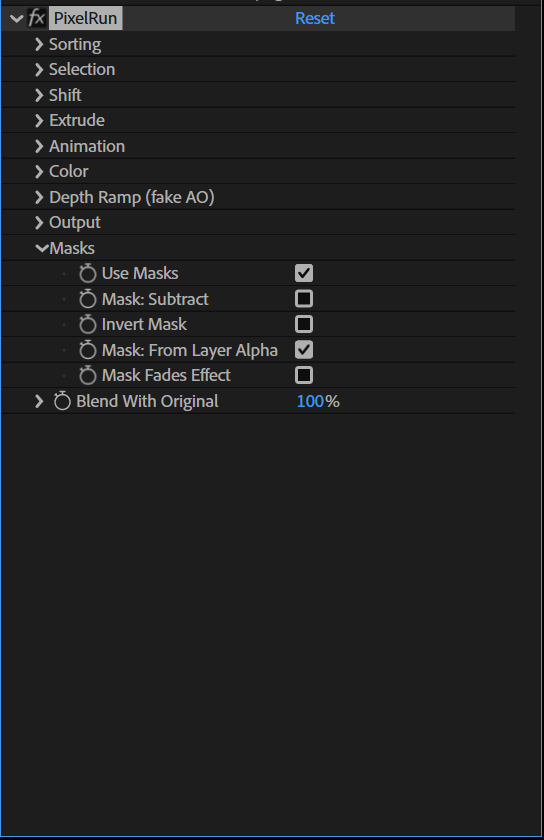
(new in v0.4) Draw masks on the layer and PixelRun can confine itself to them — or keep out of them. Switch Use Masks on and the effect reads the layer's masks directly; you do not have to point a parameter at them.
What is honoured. The layer's actual mask composite — each mask's own mode (Add, Subtract, Intersect, Lighten, Darken, Difference) is applied in order, exactly as After Effects composites them, so what confines the effect is what you see on the layer. After Effects rasterises the shapes itself, so the edges are properly anti-aliased and follow the render quality.
Mask: Subtract — off (default) the effect runs inside the masked area; on, it runs outside it. Invert Mask flips the coverage before that choice is applied, so Invert + Intersect gives exactly the same result as Subtract.
Where the mask acts. On the selection, before the runs are found — not as a stencil laid over the finished picture. A run therefore starts and stops at the mask edge instead of being cut out of a longer run, which is what keeps the sorted material coherent. One consequence worth knowing: in Float or Stretch mode a run that is selected inside the mask can still land outside it, because the mask governs where sorting begins, not where the pixels are allowed to end up. In Sort (in place) mode nothing outside the mask changes at all.
Mask: From Layer Alpha — (new in v0.5, on by default) where the coverage comes from. There are two ways to get it, and they are good at different things.
On (the default): the layer's alpha, which is After Effects' own mask composite. A layer is rendered masks first, then effects, so by the time PixelRun sees the layer After Effects has already applied every mask to it — and the alpha that arrives is the finished composite. That means everything comes across, for free and per frame: any number of masks, each with its own Feather, Expansion and Opacity, every mask mode composited exactly as After Effects composites it, animation included — and variable-width feather (feather handles on individual mask points) too, which no per-mask reading could ever reproduce. Nothing is approximated here, because After Effects did the work.
Two things to know about this route. It cannot tell the mask apart from the footage's own alpha: on opaque footage that is not a question, but on a layer that already has transparency, the transparent parts count as masked out. And where the alpha is fully zero the picture is premultiplied to nothing, so there is no material there to sort — which leaves Mask: Subtract with only the mask's soft rim to work on. Wherever the alpha is between 0 and 1 the inverted coverage is above zero and the effect does run, so on a feathered mask Subtract gives you an effect that lives inside the feather band alone; on a hard-edged one it really does nothing here. For a true "everything outside the mask", switch Mask: From Layer Alpha off. If the alpha turns out to be fully opaque everywhere, PixelRun treats it as "no mask at all" and the effect runs untouched.
Off: PixelRun composites the mask shapes itself. Each mask's shape and mode are used, with a hard, anti-aliased edge — the mask panel's Feather, Expansion and Opacity are ignored. This is v0.4's behaviour, and it is the route to use when you want Mask: Subtract (the effect running outside the mask), because it keeps the picture on both sides of the mask edge.
A hard-edged mask renders the same on either route; the difference only shows up once a mask is feathered, expanded or made partly transparent.
What a soft edge actually does — and Mask Fades Effect. Coverage multiplies the strength of the selection, before the runs are found. That is deliberate, and it is not the same thing as fading the effect out:
- In Sort mode a half-covered pixel is still fully sorted — sorting has no "half". What the soft edge does there is move the run boundary: the runs simply stop where coverage reaches zero, so the edge is a blurred border rather than a dissolve.
- In Float, Stretch and Extrude the strength is the whole point, so the feather really does ramp the effect down. In Extrude this is the nicest one: the towers get shorter towards the mask edge and settle back into the picture, instead of a wall of buildings ending at a line.
Switch Mask Fades Effect on — it is off by default — and the coverage also acts as a per-pixel opacity: Blend With Original follows the mask's own feather, pixel by pixel. At full coverage you get the whole effect; at zero coverage the original frame, bit for bit; in between an exact cross-dissolve between the two. Combined with the selection weighting above, a feathered mask now genuinely fades the effect in, which is what most people expect a soft mask to do and what no amount of thresholding can imitate. Invert Mask and Mask: Subtract apply to the fade in the same direction as they apply to the selection, so the two never fight.
Off, the switch costs nothing and is not evaluated: the render is bit for bit what it was.
With Use Masks off — the default — the mask code never runs and the render is bit for bit what it was.
Previewing at Half and Quarter resolution
(fixed in v0.4) Everything in PixelRun that draws a random number — the Noise driver, the noise field, Break Noise, Break Evolution, Offset Random and the new Max Length Random — used to draw a different number at a reduced preview resolution. The consequence was that a Half-resolution preview showed a different pattern from the final render: about half of the pixels disagreed. It looked like the effect was unstable; it was not, it was resolution-dependent.
In v0.4 the random keys are computed in composition space, so a reduced preview now draws the same numbers as the full render. Measured on the default settings, Full-vs-Half agreement went from 50.05% to 100%.
One limit is worth stating plainly, because it is arithmetic rather than a bug: a Half preview takes half as many samples as the full render, so at Band Width 1 and Driver Cell 1 it can only ever show half of the full render's decisions. What v0.4 guarantees is that every sample it does show is exactly the one the full render would produce at that position — the preview is a true subset, not a different picture. With Band Width ≥ 2 and Driver Cell ≥ 2 the preview is pixel-identical to the full render.
Preview recipe: while you work, keep Driver Cell and Band Width at 2 or more. Either of them at 1 is enough to make the reduced preview coarser than the final render.
Blend With Original
Blend With Original is the dry/wet mix of the whole effect, alpha included: at 100% you get the full result, at 0% the untouched layer, and in between a straight interpolation of the two. Because alpha is mixed as well, dialling it back also brings the punched-out areas of a Transparent fill partly back. At 0% it is a second bit-exact off switch, and unlike Threshold 100% it works in every Affect mode.
Performance
The band and run tables are built once per frame, single-threaded, over the whole layer; the shading pass that follows is per-pixel and multi-threaded, and Multi-Frame Rendering renders several frames in parallel on top of that. Radial and Directional cost about the same. The sort itself is the cheap part — the runs are short, and a short stable sort on a contiguous array of keys is very fast; the expensive parts are the driver field and the table build.
Memory scales with the layer, not with the settings. The permutation is one 32-bit index per lane point, and the lanes together cover the layer once, so the model's arithmetic gives about 33 MB on a 4K layer for the permutation plus about 10 MB for the driver field, regardless of Band Width or Max Length. At 1080p everything is about four times smaller. This is a very different profile from the withdrawn v0.1 model, whose memory doubled every time Band Width halved; here Band Width 1 and Band Width 100 cost the same. Block sorting does not change it either: the block keys live in a scratch array one run long.
What v0.3 adds to the bill — measured (single thread, -O2, offline harness, the same 640×480-derived 1080p and 4K frames as v0.2; build = tables, shade = the per-pixel pass):
| frame | setting | build | shade | tables in memory | runs |
|---|---|---|---|---|---|
| 1080p | defaults | 0.11 s | 0.23 s | 8.0 MB | 1 956 |
| 1080p | Block 4×4 | 0.12 s | 0.24 s | 8.0 MB | 1 956 |
| 1080p | Noise Complexity 4 | 0.18 s | 0.23 s | 8.0 MB | 4 891 |
| 1080p | Float + Offset Random | 0.11 s | 0.23 s | 10.0 MB | 1 956 |
| 4K | defaults | 0.45 s | 1.05 s | 31.9 MB | 7 084 |
| 4K | Block 4×4 | 0.52 s | 1.05 s | 31.9 MB | 7 084 |
| 4K | Noise Complexity 4 | 0.70 s | 1.06 s | 32.1 MB | 19 774 |
| 4K | Float + Offset Random | 0.42 s | 1.07 s | 39.8 MB | 7 084 |
The "defaults" rows above are Band Width 4 / Driver Cell 4 — the v0.3 defaults. v0.3.1 opens at 1 / 1, and on the same harness that costs a 4K build of about 1.8 s (1080p: 0.25 s) with the shading pass unchanged, and a Float / Stretch source table of ~32 MB at 4K instead of ~8 MB (every column is its own band). Driver Cell 4 on its own brings the build most of the way back; Band Width 4 brings back the memory.
Reading the table:
- Noise Complexity is the one genuinely expensive new control — each octave is another four lattice hashes per driver sample. Complexity 4 adds about 55% to the build (and cuts the frame into far more, shorter runs); the shading pass does not change. Complexity 1 is nearly free.
- Block Width / Block Height add an averaging pass over each block: a 4×4 block sort costs about 13–16% more build time than a pixel sort, and nothing at all in shading or memory — the permutation is the same size, the block keys live in a scratch array one run long.
- Offset / Offset Random in Sort mode switch the effect onto the Float path, which keeps an extra source table — the same ~25% memory step Float has always cost (4K: 31.9 → 39.8 MB). Going from Sort to Sort-with-an-Offset is therefore a memory increase, not a time one.
- Anim Growth, Cycle, Output Mode, Feather and Preserve Alpha are within the noise: a window index, a modular add, one comparison, one lerp. Growth 0% builds nothing at all — a 0→100% keyframe costs nothing on its first frame.
The v0.2 baseline for comparison: a 4K frame at Band Width 4 took about 0.43 s to build and 0.87 s to shade (Band Width 1: 0.65 s + 0.90 s), 1080p about 0.10 s + 0.22 s, with a build-time peak of about 46 MB at 4K (32 MB of permutation that stays for the frame plus the 10 MB driver field that is freed after the build); Float peaked at about 78 MB. The shading half is what Multi-Frame Rendering spreads across cores; the build runs once per frame on one thread.
What Extrude costs — measured in After Effects (AE 26.3, 8 bpc, render queue, caches purged before every run, five runs, median; plugin = the render with the effect minus the render without it). On a 4K layer: Sort (in place) 5.9 s, Extrude 5.5 s — about 6% less, because with Sort Before Extrude off the permutation is never built — and 7.4 s with Sort Before Extrude on (+26%). At 1080p all three sit under the measurement noise (< 50 ms). Memory tells the same story: +480 MB for Sort, +512 MB for Extrude, the 32 MB between them being exactly the column table (4 bytes per pixel × 8.3 Mpx). Extrude is not the expensive mode; sorting first is.
Two shortcuts are worth knowing. Threshold 100% with Affect = Inside Thresholds — or any setting that selects nothing — short-circuits the entire effect, including the Depth Ramp, and returns the original frame bit for bit without building a field at all. And every pixel outside a run is copied straight from the source rather than resampled, so untouched areas stay absolutely sharp; at 0°, 90°, 180° and 270° that is true of the sorted pixels too.
Recipes
- Highlights sorter (the classic): Driven By Luma (Highlights), Threshold ~60%, Range ~30%, Angle 90°, Band Width 1–2 px, Driver Cell 1, Sort By Luma, Limit Length off, Shift Mode Sort (in place). The bright parts of each row comb themselves into order.
- Shadows sorter: the same, but Driven By Inverted Luma (Shadows) and Threshold ~40%. Sorting the dark end of a night exterior is far more subtle than sorting the highlights, and usually more usable. The modern spelling is Driven By Luma with Affect on Outside Thresholds, which gives you the same selection and a free inversion of anything else.
- Mid-tones only: Threshold 40%, Upper Threshold 60%, Range 20%, Affect Inside. The sorting stays out of both the blacks and the blown highlights, which is the setting that usually survives a client note.
- Bacon curtain: Shift Mode Stretch, Sort By Luma, Angle 0°, Amount 200–400 px, Band Width 6–12 px, Driver Cell 4, Threshold ~45%, Limit Length off, Along-Band Variation 100%. The sorted tone is drawn downwards into hanging ribbons of graded meat. Add Ramp Amount 60%, Normalize Global to give the long ribbons weight.
- Glitch: Sort By Hue, Break Noise 20–40%, Driver Cell 8, Limit Length on with Max Length 64, Band Width 3, Threshold ~35%. Coherent blocks of rearranged colour that shatter unpredictably — the hue key does the damage, Break Noise does the timing. Swap Sort By to XOR to take it past glitch and into corruption.
- Datamosh tiles: Block Width 8–16, Block Height = Band Width (so the tiles are square), Band Width 8–16, Sort By Luma, Limit Length off, Along-Band Variation 100%. The picture is re-shuffled in recognisable fragments instead of being combed, which reads as compression damage rather than as a sorter.
- Floating particles: Threshold high (~75%) so only small bright specks qualify, Limit Length on, Max Length 8, Driver Cell 1, Band Width 1–2, Shift Mode Float, Amount 0, Offset 0, Offset Random 60–150, Fill Original, Feather Start/End 2–4. Hundreds of tiny sorted fragments scatter along the band by different distances, each one softened at both ends. Change Seed to re-cast the whole swarm. Keyframe Offset Random from 0 upwards and the frame comes apart.
- Growing streaks: any sorter setting you like, then keyframe Anim Growth from 0 to 100% across two seconds. At 0 the frame is bit-identical to the source, so the effect grows out of nothing; each run fills from its Growth From end, short runs completing first. Add Feather End 8 to keep the growing tip soft. Growth From → End reverses the direction of growth without touching Order or Angle.
- Endless flow (loop): Mirror on, Order Ascending, Limit Length off (long runs move smoothly), then two Linear keyframes on Cycle: 0° at the first frame, 360° at the last. The sorted material flows along every run and the loop closes exactly — the last frame is bit for bit the first. Combine with a Stretch shift for a curtain that flows, or with Anim Growth at 60% for a flow that only occupies part of each run.
- Travelling glitch: the Glitch recipe above, then Break Drift keyframed from 0 to −400 px over the shot (the cuts run against the sort direction) and Break Evolution from 0° to 360° over the same span, so the shatter pattern both moves and slowly changes. Seed picks the starting pattern; nothing boils, because every frame is a deterministic function of the two values.
- Soft matte from the sorting: Output Mode Matte, Feather Start/End 6, everything else as your main render. Use it as a Track Matte or a Set Matte source over the untouched footage — you now have a hand-off point between the sorted and the unsorted picture that you can grade, blur or delay independently.
- Flat bars: Output Mode Stretch First Pixel, Order Descending, Limit Length on with Max Length 120, Band Width 20. Every run becomes one flat bar of its own brightest colour. Add Gradient Map by Position to put a sweep back into the flats.
- Mirror loop: Mirror on, Order Ascending, Sort By Luma, Band Width 8–16, Limit Length on with Max Length ~120, Along-Band Variation 30%. Every run has a bright spine down its middle; at low Variation the runs line up into even blocks and the frame reads as a woven, symmetrical panel. Keyframe Angle from 0° to 90° over the shot for a slow weave.
- Run map: Gradient Map by Length, gradient Thermal, Shift Mode Sort (in place), Ramp Amount 0. The frame colours itself by how long its runs are.
- Depth pass on its own layer: two identical copies, top one Depth Ramp Only, Normalize Global. Use it as a matte or a displacement source for the copy below.
- Audio-reactive sorting: select the music layer → Animation → Keyframe Assistant → Convert Audio to Keyframes, then pick-whip a parameter to the Audio Amplitude slider. Three targets, three different readings of the same track. Anim Growth (something like
value*8) is the safest and the most musical: the sorting grows into each run on the hit and heals between, and at 0 the frame is bit-identical to the source, so the quiet passages are genuinely untouched footage. Threshold with a negative multiplier (60 - value*3) lets more of the picture qualify as the track gets louder, so the effect spreads rather than deepens. Offset Random in Float (value*10) is the violent one — the frame comes apart on the kick and reassembles. ☠ Two practical notes. Convert Audio to Keyframes writes one keyframe per frame, so the raw value is as jumpy as the waveform: divide it well down, and run Window → The Smoother over the slider if percussive material makes the sorting stutter. And leave Seed alone while you do this — a Seed that moves re-casts every run every frame, which reads as noise rather than as rhythm. For the beat in the timing rather than in the amount, drive Break Noise instead and keep everything else still.
A note on test material. When matching a reference still, feed the plugin a PNG, not a JPEG. JPEG's 8×8 blocks are exactly the kind of local contrast the driver is looking for, and a Driver Cell of 4 or 8 will happily turn the compression grid into a run structure of its own.
Alpha
The effect writes alpha on every pixel, in straight alpha as After Effects expects. Inside a sorted run the alpha is the alpha of the pixel that landed there, so masks and feathered edges are sorted along with the colour they belong to; outside the runs the original alpha passes through untouched. In Float with Transparent fill the vacated areas are genuinely empty (0,0,0,0). In Depth Ramp Only the alpha is the layer's own alpha scaled by Ramp Opacity. In Output Mode → Matte the alpha is the layer's own alpha, unscaled — the matte is written into the colour channels, not into alpha.
Feather fades alpha along with colour, so a feathered Transparent run has a soft alpha edge. Preserve Alpha overrides all of the above and writes the layer's original alpha everywhere — including over a Transparent fill's hole and over Ramp Opacity. Blend With Original mixes the alpha along with the colour.
Sorting by Alpha (Sort By → Alpha) and selecting by Alpha (Driven By → Alpha) both read the same straight alpha, so a layer with no transparency has a completely flat key there and the sort is an identity.
Coming next
Two things on this list are still designed and not built — Driven By: Map Layer and Priority, both described below. Everything else this section used to promise has since shipped, and is documented in its own chapter: Max Length Random and the Clip mode in v0.4 (see How long are the runs?), Masks in v0.4 with feathering in v0.5 (see Masks), Extrude and Absolute Length in v0.5, and Spaced Out in v0.7 (see Shift).
Driven By: Map Layer — any layer in the comp deciding the selection by its luminance, instead of the layer's own pixels: paint the runs where you want them. As with every AE layer parameter, the map will be taken from the layer's source, ignoring its own effects and masks — so use a precomp: precompose your noise/gradient/ripple setup and pick the precomp. Animate anything inside it and the runs follow.
Priority — a per-run ordering control for what passes in front of what when floated or stretched runs overlap, replacing the current fixed rule (the one that travelled further, or stretched longer, wins). Spaced Out sidesteps the question entirely: its runs are laid down back to back, so by construction no two of them can ever land on the same pixel.
An OpenFX build for DaVinci Resolve is a separate host port of the same core; it is not part of the After Effects roadmap above, and it will not change any of the behaviour described here.
Two things that are not coming, and why. The reference sorters offer a Strips control and an Invert switch; PixelRun has neither, on purpose. Strips is what Band Width (px) already is — the width of the coherent slab, from 1 px (per-row sorting) upwards — so a second control would only be a second name for it. Invert is covered twice over by Order (which flips the sorted sequence) and Affect → Outside Thresholds (which flips the selection); between them there is no inversion left to ask for, and one checkbox that meant "one of those two, depending on context" would be worse than either.
Version notes
- v0.7 — Spaced Out. One new Shift Mode, no new parameters, no new disk IDs; saved projects open unchanged and every other mode is bit for bit what it was in v0.6.
- Spaced Out — the selected runs of each band are packed one after another from the start of the band instead of sitting where they were found. ☠ The first mode in the plugin that discards the unselected pixels rather than leaving them alone: what was between the runs is gone, not displaced. Absolute Length off gives compression, on gives an even grid; the remainder of the band is filled by Fill Mode (whose Wrap and Clamp repeat the packed sequence here, not the original frame); Amount and Offset are greyed out, because the running cursor decides every position. Packing is per band, so the image shears band by band — row by row at Band Width 1. With a full selection the mode is bit-identical to Sort.
- v0.6 — Two controls that were lying. Both came out of a measured pass over v0.5 in After Effects, and both are the same complaint: a control that looked live and did nothing.
- Invert Height (new, disk ID 86, off by default) — the negative side of Height by Driver did nothing on its own, because heights clamp at zero and Base Height starts at the same number first. Now it is a checkbox.
- The behaviour it promised was reachable, but only by knowing to raise Base Height to
- Top Light is now Top Light / Shade and runs from −100%: it never darkened, in any setting, because the host clamped the value at zero before the core saw it. The core's formula was signed all along. No new parameter, no new disk ID, and 0 is still an exact no-op.
- Invert Height (new, disk ID 86, off by default) — the negative side of Height by Driver did nothing on its own, because heights clamp at zero and Base Height starts at the same number first. Now it is a checkbox.
- v0.5 — Height instead of order. Eleven new parameters (disk IDs 75–85), one new Shift Mode, and one deliberate change to an existing control.
- Extrude — a fourth Shift Mode in which every selected pixel grows into a column as tall as its own driver value asks, with the column in front hiding the one behind it only up to its own height. The first mode in this plugin that is not a permutation, and therefore the first that does anything at all to runs a single pixel long. With it: Base Height (px), Height by Driver (px), Sort Before Extrude, Tower: Stretch Run, Top Light and Top Light Depth (px). The Depth Ramp and the Gradient Map now read a position along the column, so the fake AO shades each façade. It is a 2D height field — no mesh, no camera.
- Absolute Length — Max Length (px) as a target rather than a ceiling: every run shown at exactly that length, short ones stretched up to it. Works with Limit Length off, which is the length control that was missing.
- Break Noise is now read as cuts per 100 px and no longer changes meaning when Driver Cell changes. ☠ This is the one change that can alter an existing render — but only where Driver Cell was set to something other than 1 and Break Noise was non-zero. At Driver Cell 1 the arithmetic is unchanged, bit for bit.
- Mask: From Layer Alpha — the mask coverage can now be taken from the layer's alpha, which is already After Effects' own mask composite: any number of masks, each with its own Feather, Expansion and Opacity, every mask mode, variable-width feather included, per frame. On by default; switch it off for v0.4's hard-edged shape-only route, which is what Mask: Subtract needs.
- Mask Fades Effect — the mask's coverage can now act as a per-pixel opacity as well as a selection weight, so a feathered mask cross-dissolves the effect into the untouched frame instead of only softening where the runs end. Off by default.
- Every other default is an exact no-op: the offline manifest's 41 cases are bit-identical to v0.4 on gcc, clang and MSVC, at -O0/-O2/-O3 and under ASan+UBSan.
- v0.4 — The length controls, a preview fix, masks, and a panel that tells the truth. Eight new parameters (disk IDs 66–74) and one behaviour fix; every one of them is an exact no-op at its default, so a v0.3.2 project renders bit for bit what it did.
- Length by Driver (px) — run length in pixels, modulated by the driver, signed. The control that was missing: until now nothing tied the length of a streak to the picture except Stretch's Amount. See How long are the runs? at the top of this guide.
- Clip Instead of Split — sort one piece of a run and leave the rest of it untouched, instead of chopping the whole run into sorted pieces.
- Max Length Random (px) and Jitter Per Piece — scatter on the cutting length, drawn per piece by default, which is what actually breaks the repeating rhythm inside a long run.
- Masks — confine the effect to the layer's masks (or keep it out of them), honouring the layer's real mask composite. Mask opacity, feather and expansion are not read in v0.4.
- Half/Quarter previews now match the full render. Every random draw is keyed in composition space. Measured on the defaults, Full-vs-Half agreement went from 50.05% to 100%. Keep Band Width and Driver Cell at 2 or more while previewing — see the section on previewing.
- Feather now softens the Transparent hole, not only the run that floated away.
- Parameters that cannot affect the render are greyed out. This one is a bug fix in disguise: with Limit Length off, Max Length sat in the panel looking live while it was doing nothing to the geometry, and it cost real time to work out that the plugin was behaving correctly. The panel now says so.
- Under the hood: vertical downsampling is finally read from
downsample_yrather than being assumed square, which matters only for anamorphic or custom-resolution comps, and the parameter table is now guarded by compile-time assertions.
- v0.3.1 — Limit Length. One new switch (disk ID 63), off by default, and one deliberate change of behaviour: Max Length no longer cuts runs unless Limit Length is on. The cutting produced an edge at exactly Max Length from wherever a run began — a straight line across the frame where a bright region met the frame edge, a shifted copy of a disc's lower rim inside the disc, concentric rings in Radial mode — and no choice of anchor can remove that, because a fixed-length cut is by definition a shifted copy of the boundary it is measured from. The reference plugin does not cut at all, and neither does v0.3.1 by default. With the switch on, the v0.3 cutting is back, with one improvement: a run cut off by the frame edge is measured from its content end. Max Length keeps its second job (the yardstick of Global normalisation and the by Length gradient) in both states. Projects saved from v0.3 render identically except where a run was longer than Max Length. Defaults: Band Width and Driver Cell now open at 1 (were 4) — the classic per-row, pixel-exact sorter; saved projects are unaffected. Version PF_VERSION(0,3,1,DEVELOP,1); offline manifest baseline-4, 39 cases.
- v0.3.2 — Break Drift + Break Evolution (disk IDs 64, 65), the animatable perturbation for Break Noise. Drift (px) slides the break grid along the band, so cuts travel; Evolution (angle, one revolution = the next Seed exactly) switches each cell from its current roll to the next seed's at a cell-specific moment, so cuts tip over one by one instead of jumping and the density of breaks stays put. Both are exact no-ops at 0 and inert while Break Noise is 0%, so every existing render is bit-identical: the 39 manifest rows are unchanged and two new cases are appended (41). Version PF_VERSION(0,3,2,DEVELOP,1).
- v0.3 — the reference feature set, added without disturbing a single v0.2 render: every new parameter is a documented no-op at its default, the original 16 baseline cases are bit-identical, and disk IDs 1–41 are untouched (the new controls take 42–62).
- Sort By gains Alpha, Minimum, Maximum and XOR — appended after the original six, so saved projects keep their key.
- Driven By gains Alpha, Saturation, Hue, Minimum, Maximum, Red, Green and Blue, read from the same Driver Cell average as the luma driver.
- Upper Threshold turns Threshold into a selection window, and Affect (Inside Thresholds / Outside Thresholds) inverts the whole selection stage.
- A noise field — Noise Amount, Noise Scale (px), Noise Complexity — modulates the driver before the thresholds, with every driver, using deterministic value noise.
- Seed is now a parameter, shared by the Noise driver, Break Noise, the noise field and Offset Random.
- Block Width (px) and Block Height (lanes) sort tiles instead of pixels, keeping the original order inside each tile; 1×1 is the v0.2 pixel sorter, on its own code path.
- Offset (px) and Offset Random (px) displace runs independently of the driver; setting either of them in Sort (in place) mode switches the run onto the Float path with Amount 0, which makes Fill Mode live in that mode.
- A new Animation group: Anim Growth + Growth From shrink each run to a growing window (0% = the original frame, bit for bit), and Cycle rotates the sorted sequence inside its run — 360° is bit-identical to 0°, which makes Mirror + a 0→360° keyframe pair a seamless loop.
- A new Output group: Output Mode (Sorted Pixels / Stretch First Pixel / Stretch Last Pixel / Matte), Feather Start (px) and Feather End (px) fading each run's ends back into the picture, and Preserve Alpha, which writes the layer's original alpha over everything the effect did — including a Transparent fill's hole.
- Not added, deliberately: a Strips control (Band Width (px) is that control) and an Invert switch (Order inverts the sort, Affect inverts the selection).
- Version PF_VERSION(0,3,0,DEVELOP,1). Performance numbers are being re-measured; the Performance section carries the v0.2 baseline until they are in.
- v0.2 — first build, and a change of model. PixelRun is a pixel sorter: band-wise selection by luma, inverted luma or noise with Threshold and Range, runs capped by Max Length (px) and broken statistically by Break Noise, and a stable sort along each 1-pixel lane by Luma / Hue / Saturation / Red / Green / Blue, Ascending or Descending, with an optional Mirror for a bright spine down the middle of every run. Run boundaries are shared by every lane of a band, so Band Width (px) controls how chunky the tearing is (1 px = the classic per-row sorter). At 0°, 90°, 180° and 270° the sort is an exact permutation of the source pixels. Shift Mode adds Float (the sorted run slides, with four Fill modes behind it) and Stretch (the sorted run lengthens over what lies ahead). Depth Ramp (fake AO) shades runs from start to end, with Per Streak / Global normalisation, and Depth Ramp Only now emits a greyscale depth map with Normalize acting as its direction/length selector. Gradient Map applies to the runs only, indexed by Position, by Luma or by Length. Directional and Radial (spoke) modes, analytic band-edge coverage, cell-average driver with selectable Driver Cell, the shared ivo3d gradient engine, and deterministic maths throughout (
ivo3d_detmath.h, no libm in the core). Windows x64, AE 2022+, 8/16/32 bpc, MFR. Measured at 4K: 0.43 s build + 0.87 s shade single-threaded, 46 MB peak.- The v0.1 "displacement" model is withdrawn. v0.1 described PixelRun as a band displacement effect — bands sliding along their own axis by an amount the driver decided, with content stretching into streaks between root and tip, a z-buffer deciding which streak passed in front, and a
by Displacementgradient index. After testing it in After Effects the displacement model was retired before release in favour of the pixel sorter. v0.1 never shipped, so no project can contain it and nothing needs migrating; the parameter list was renumbered cleanly for v0.2 rather than having the new controls appended to the old ones. What survived the change is the machinery underneath: the band geometry with its analytic edge coverage, the cell-average driver with Threshold, Range and Along-Band Variation, the Depth Ramp and gradient engines, and the deterministic maths. What did not survive is the along-band arithmetic itself — displacement became selection plus sorting — along with Amount's meaning (now confined to Float and Stretch), theby Displacementgradient index (replaced by by Length), and the compositable Multiply-based Depth Ramp Only pass (replaced by the depth map described above).
- The v0.1 "displacement" model is withdrawn. v0.1 described PixelRun as a band displacement effect — bands sliding along their own axis by an amount the driver decided, with content stretching into streaks between root and tip, a z-buffer deciding which streak passed in front, and a
- v0.1 — withdrawn, never released. Band displacement with Along-Band Variation, cell-average driver, four Fill modes, Depth Ramp (fake AO) as a Multiply-compositable shading pass, and a
by Displacementgradient index. Superseded by v0.2 before it shipped; no project exists that uses it, and its disk IDs were reclaimed rather than reserved.
Questions & answers
The matte is exactly right and the picture still does not change. Is it broken?
No — it follows from what sorting is. Sorting is a permutation: the same pixels, on the same stretch, in a different order; nothing is added and nothing travels past the run's ends. Two consequences catch everyone once. A one-pixel run sorts to itself — scattered bright specks give runs one pixel long, and one pixel has one order. Content that is already in order sorts to itself — a sky that is bright at the horizon and dark at the top is already descending along an upward sort; flip Order to Ascending and the same area turns inside out, which proves it was selected all along. Block Width / Block Height amplify both, so set them back to 1 before suspecting anything else. If you want material to travel or grow, sorting is the wrong tool: Shift Mode → Float / Stretch move it, and Extrude gives every selected pixel a height instead of an order — it is the mode that works on one-pixel runs, and it is why the mode exists. See Why does nothing happen here?
How long are the runs? Max Length seems to do nothing.
Because by default it does not cut: Limit Length is off, and a run is exactly the stretch the picture nominates — from where the driver crosses Threshold to where it crosses back — however long that is. Five things decide the length, and only one is a number you type: Threshold / Upper Threshold (the picture decides — the clean way to shorten runs, it never produces a repeating edge), Anim Growth (a percentage of each run's own length), Limit Length + Max Length (an absolute cap — and every cut is an edge, a copy of the boundary shifted by Max Length; Max Length Random and Clip Instead of Split are the two cures), Length by Driver (the cap modulated by brightness — the control most people are actually looking for) and Amount in Stretch mode. From v0.4 every parameter that cannot affect the render is greyed out, so a switched-off control looks switched off. And the slider is not the limit: Max Length drags to 1000 but accepts 8192 typed in. See How long are the runs?
My selection came out as a thin sliver of the right shape. Where did the rest go?
Three stages narrow what gets sorted, in three different groups. Switch Output Mode → Matte (white = what will be sorted) and check in order: the white has the wrong shape → Threshold / Upper Threshold; the white breaks into regular or scattered pieces → Limit Length + Max Length or Break Noise; the white is a thin sliver of the right shape → Anim Growth, in the Animation group, which at 15 % silently throws away 85 % of every run. That third one is the one that catches people, because it does not look like a size control. See Why is my selection thinner than I expect?
I only want the mid-tones sorted — not the blacks, not the blown highlights.
That is the one selection a single threshold cannot express, and it is what Upper Threshold is for: Threshold 40 %, Upper Threshold 60 %, Range 20 %, Affect Inside turns the pair into a window, so only drivers between the two are selected. It is the setting that usually survives a client note. For the complement — everything but the mid-tones — set Affect → Outside Thresholds, which inverts any selection (and is why the plugin has no Invert checkbox). See Selection and the Mid-tones only recipe in Recipes.
Sort, Float, Stretch, Spaced Out, Extrude — which mode does what to the rest of the frame?
Sort (in place) re-orders the run and moves nothing; outside the runs the frame is untouched, bit for bit. Float slides the whole sorted run along the band by Amount × its driver value — what appears in the vacated space is Fill Mode's business (Original, Transparent, Wrap, Clamp) — and a run that travelled further passes in front. Stretch keeps the run where it is and lengthens it to L + Amount × driver; nothing is vacated, so it cannot open holes — this is the hanging-curtain mode. Two modes are the honest exceptions to "the rest of the frame is untouched". Spaced Out packs the runs of each band end to end from the start of the band, and the unselected pixels between them are gone — the picture becomes a bar chart of its own selection, sheared band by band (widen Band Width to calm the shear). Extrude is not a permutation at all: every selected pixel grows a column Base Height + Height by Driver × driver along the band, a skyline drawn by the picture. See Shift, Spaced Out and Extrude.
How do I make it move — grow in from nothing, or loop seamlessly?
Two ordinary keyframable parameters in the Animation group; the plugin never reads the time. Anim Growth 0 → 100 % over two seconds: at 0 the frame is bit for bit the source, then each run fills from its Growth From end, short runs finishing first — an organic fill-in, not a wipe (for a wipe, animate Threshold). Cycle rotates the sorted sequence inside its run, wrapping around the end, so 360° returns it exactly where it started — the Endless flow recipe: Mirror on, Order Ascending, Limit Length off, two Linear keyframes on Cycle, 0° at the first frame and 360° at the last. The last frame joins the first with no crossfade (measured: 0°, 360°, 720° and 1080° render byte for byte identically); 0° → 1080° is three loops in the same time. One caveat: the rotation is a whole number of pixels, so on short runs a small Cycle rounds to nothing and a frame full of 20-pixel runs visibly steps — let the runs be long. See Animation.
How do I make the sorting react to music?
Convert Audio to Keyframes on the music layer, then pick-whip a parameter to the Audio Amplitude slider — three targets, three readings of the same track. Anim Growth (value*8) is the safest and the most musical: the sorting grows into each run on the hit and heals between, and at 0 the frame is bit-identical to the source, so the quiet passages are untouched footage. Threshold with a negative multiplier (60 - value*3) lets more of the picture qualify as the track gets louder, so the effect spreads rather than deepens. Offset Random in Float (value*10) is the violent one — the frame comes apart on the kick and reassembles. Divide the raw value well down and run Window → The Smoother over the slider if percussive material stutters; and leave Seed alone — a moving Seed re-casts every run every frame, which reads as noise, not rhythm. For the beat in the timing rather than the amount, drive Break Noise instead. See the Audio-reactive sorting recipe in Recipes.
The Half-resolution preview shows a different pattern from the final render. Which one is right?
Both — since v0.4 every random number (the Noise driver, the noise field, Break Noise, Break Evolution, Offset Random, Max Length Random) is drawn in composition space, so a reduced preview draws the same numbers as the full render (measured: Full-vs-Half agreement went from 50 % to 100 %). What remains is arithmetic: a Half preview takes half as many samples, so at Band Width 1 and Driver Cell 1 it can only show half of the full render's decisions — a true subset, not a different picture. Preview recipe: keep Driver Cell and Band Width at 2 or more while you work, and the preview is pixel-identical to the final. Driver Cell 4 alone also recovers most of the build time at 4K. See Previewing at Half and Quarter resolution.
How do I keep the sorting inside a mask — or outside it — and make a soft mask really fade the effect?
Draw the masks on the layer and switch Use Masks on; the effect reads them itself. The mask acts on the selection, before the runs are found, so a run starts and stops at the mask edge instead of being cut out of a longer one. Where the coverage comes from is the thing to know. Mask: From Layer Alpha (on by default) uses AE's own mask composite, so every mask mode, feather, expansion, opacity and variable-width feather comes across for free — but where the alpha is fully zero there is no material to sort, so Mask: Subtract then only works on the mask's soft rim. For a true "everything outside the mask", switch From Layer Alpha off (PixelRun composites the shapes itself, hard-edged) and turn Subtract on. A soft edge by itself moves the run boundary rather than fading the effect (sorting has no "half"; in Extrude the towers do get shorter towards the edge) — switch Mask Fades Effect on and the coverage also becomes a per-pixel Blend With Original, an exact cross-dissolve along the feather. See Masks.
Can I get the sorting as a matte, or as a depth map, to use elsewhere in the comp?
Both, from the same settings. Output Mode → Matte throws the picture away and returns white where a run is and black everywhere else — no gradient in it, so a Set Matte, Track Matte or luma key has nothing to slip on; add Feather Start / End 6 px for a soft-edged matte. Depth Ramp Only replaces the picture with a greyscale map of every pixel's position along its run: under Per Streak it is a direction indicator, under Global a map of run length (short runs stay dark). Feed it to a Displacement Map or a Levels-driven key, or duplicate the layer and grade, blur or delay the depth pass on its own. One rule: Matte overrides Depth Ramp Only — for the depth map keep Output Mode on Sorted Pixels. See Output and Depth Ramp Only.
How do I get the glitch / datamosh looks — and why has Seed stopped doing anything?
Glitch: Sort By Hue, Break Noise 20–40 (cuts per 100 px), Driver Cell 8, Limit Length on with Max Length 64, Band Width 3, Threshold ~35 % — the hue key does the damage, Break Noise the timing; swap Sort By to XOR to go past glitch into corruption. To make it travel, keyframe Break Drift (the cuts migrate along the band) and Break Evolution 0° → 360° (the cuts tip over one at a time to the next seed) — nothing boils, every frame is a deterministic function of the two. Datamosh tiles: Block Width 8–16, Block Height = Band Width, Band Width 8–16 — the picture is re-shuffled in recognisable fragments instead of combed. The dead Seed: Break Noise is rolled at Driver Cell boundaries, so it saturates above 100 ÷ Driver Cell — at Driver Cell 4 anything over 25 cuts every cell boundary, there is nothing left to randomise, and Seed, Drift and Evolution go inert. Lower the slider or lower Driver Cell. See Selection → Break Noise and Recipes.
My clean test image grew a run structure of its own — a grid of little blocks. Where does it come from?
From the file, not the plugin. A JPEG is built from 8×8 blocks, and the faint edges between them are exactly the kind of local contrast the driver looks for: a Driver Cell of 4 or 8 will happily turn the compression grid into runs. Feed PixelRun a PNG (or any lossless frame) when you are matching a reference still or building a test, and raise Driver Cell when you want the selection to follow the shapes of a real, noisy picture rather than its texture. See the note on demo material in Recipes and Selection → Driver Cell.