
History · Questions & answers (11)
Quadtree — User Guide (v1.5)
ivo3d FX · After Effects / Premiere Pro · Windows (macOS coming)
Quadtree recursively splits the image into squares: flat areas stay as big blocks, detailed areas break down into smaller and smaller cells. The result is the classic "adaptive mosaic" look — architectural grids that breathe with the picture, faces that crystallise out of squares, data-viz style abstraction of any footage. Cells can be filled with their own colour, with the original pixels (grid-overlay look), or through a gradient lookup (thermal-camera / neon map styles).
Find it under Effect → ivo3d FX → Quadtree (same plugin file as GIF Dither). Works in 8, 16 and 32 bpc, supports Multi-Frame Rendering, and every parameter can be keyframed or driven by expressions. The effect is time-independent: a still frame with still parameters renders once and caches — animation comes from the footage itself or from keyframes.
History
Where the name comes from
The quadtree is a data structure before it is a look. Raphael Finkel and Jon Bentley named it in 1974 (Acta Informatica) as a way of indexing points in two dimensions; the region quadtree — recursively splitting an image into four equal squares until each square is uniform — followed in the late 1970s in image-processing work by G. M. Hunter and by Hanan Samet's group, first for compressing binary images and labelling regions. The same recursion runs under a lot of software you never see: level-of-detail in game engines, spatial indexes in GIS, collision detection. As an image style it surfaced in the 2010s in generative-art sketches (Michael Fogleman's Quads, 2014, is the one most people have seen): split where the picture has detail, paint each leaf with its average — the "adaptive mosaic". Quadtree runs that recursion on the CPU, which is what makes exact cell averages, a real subdivision-level height source and the 2.5-D extrusion possible.
Quick start
- Apply to any footage with tonal variation. Default settings give a mid-density mosaic with thin black outlines.
- Lower Detail Threshold for a finer, more nervous subdivision; raise it for calm, big blocks.
- Try Fill Mode → Gradient Map with the Nightlight or Thermal gradient for the lookup looks; or Original Pixels + white stroke for a blueprint/grid overlay.
Subdivision
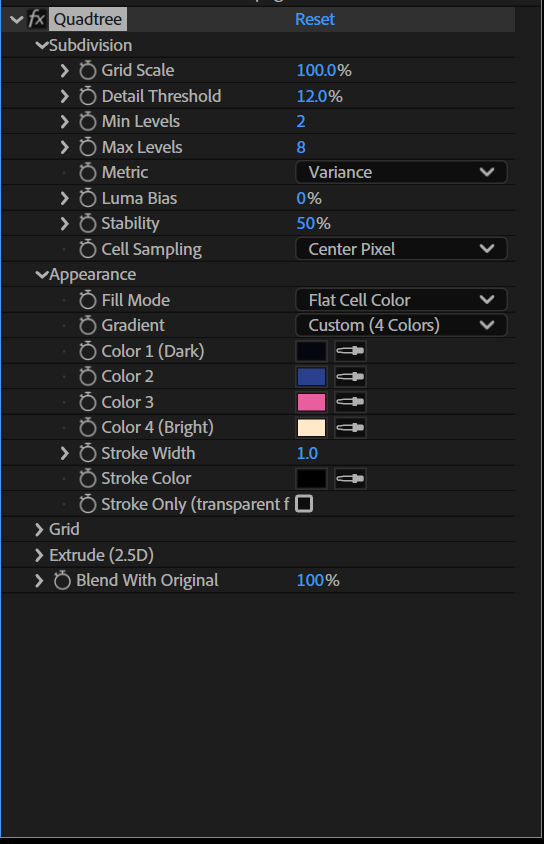
Grid Scale — the size of the root square. 100% = the layer's height (one root cell fills the frame vertically). Raise it to ~178% on 16:9 footage for a single root cell spanning the full width; shrink it for a denser base grid. Fully keyframable — animating it zooms the whole subdivision structure. Resolution-independent: the same percentage gives the same look in any comp size and at Half-res previews.
Detail Threshold — the split decision. A cell splits while its detail metric is above the threshold. Lower = more splitting (finer mosaic), higher = calmer. 0% splits everything to Max Levels; very high values leave everything at Min Levels. Keyframe or audio-drive it: louder music → lower threshold → the mosaic shatters on the beat.
Min Levels — this many splits always happen, regardless of detail (default 2 = at least a 4×4-ish base grid). Raise it to guarantee a minimum resolution.
Max Levels — the subdivision cap (default 8). Each level halves the cell, starting from a root square the height of the layer. Cells never go below 2 px, so on small previews the deepest levels simply stop earlier — Half-res previews match the final structure.
Metric — what "detail" means:
Variance — tonal spread inside the cell (9-point sample). The all-rounder; smooth gradients survive as big blocks, texture splits.
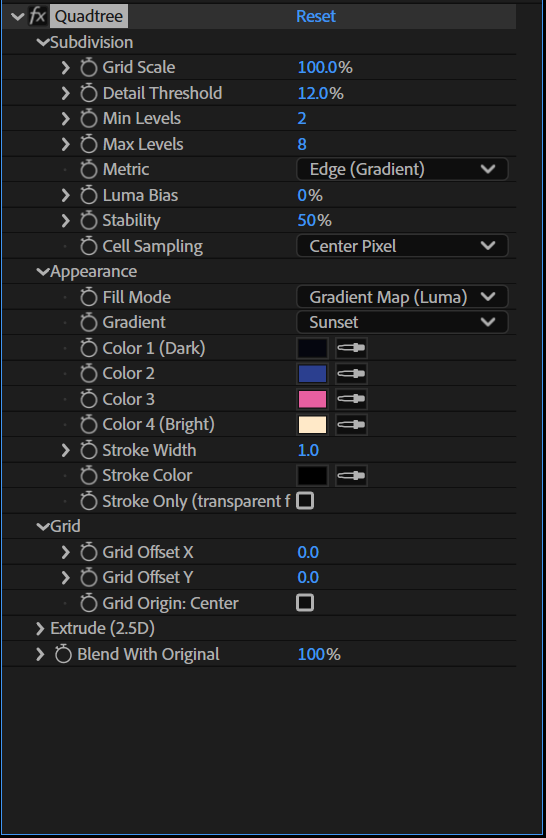
Edge (Gradient) — maximum contrast against the cell centre. More sensitive to single hard edges; outlines of shapes get chased into fine cells while flat interiors stay big.
Luma Bias — steer the subdivision tonally: positive values make bright areas split finer, negative values favour the shadows. Strong effect — ±50% already reads clearly.
Stability — smooths the detail analysis (a small blur on the metric samples, ~5 taps). On noisy/grainy footage the subdivision boundary stops flickering frame to frame (measured on synthetic noise: ~35× fewer cell flips at 100%). Side effect by design: higher values ignore micro-detail, so the tree gets slightly calmer/coarser. On very regular synthetic patterns (checkerboards) mid values can occasionally sit on the decision boundary — if a region still flickers, push Stability towards 75–100% (or 0) rather than leaving it in between. Clean renders don't need it: set 0 for the most literal subdivision. Stability has no effect when Cell Sampling is set to Average: Metric or Average: Both — averaging a whole cell already is the smoothing, and a much more thorough one (see below).
Cell Sampling (v1.4)
site/imgs/quadtree/cell-sampling.pngdrop the file in with this name and it appears hereThis is the one control that decides what the effect looks at when it looks at a cell. By default Quadtree reads a handful of individual pixels — the classic behaviour. Switch it and the plugin reads the average of every pixel the cell covers instead.
Four settings:
Center Pixel — the default, and bit-for-bit the v1.3 behaviour. The split decision comes from a 9-point sample inside the cell; a Flat or Gradient cell takes its colour from the pixel at the cell's centre. Nothing about your existing projects changes.
Average: Metric — only the subdivision decision switches to averages. Instead of 9 individual taps, the cell compares the averages of its 4×4 sub-cells (2×2 near the finest levels). Film grain, sensor noise and single stray pixels stop forcing splits, because a grain speck disappears into the average of a few hundred pixels — while a real edge, which changes the average of a whole sub-cell, still splits the cell. The practical result on noisy or high-ISO footage: markedly bigger, calmer cells at the same Detail Threshold, and a structure that stops crawling frame to frame. Because the averaging is the smoothing, Stability is ignored in this mode — leave it wherever it is. This mode also makes Grid Scale behave properly at large values: with centre-pixel sampling a huge root cell is judged from 9 taps spread across it, which saturates, whereas the averaged metric keeps resolving detail as you push Grid Scale to 200%, 400% and beyond.
Average: Fill — only the appearance switches. A Flat Cell Color or Gradient Map cell is painted with the average colour of the pixels it covers rather than the colour of one pixel at its centre, and an extruded block takes its height from the cell's average brightness rather than from that one pixel. Three things follow. Cells stop flickering when a bright speck happens to drift across a cell centre. Colours read as the true tone of the area, the way a proper mosaic or a GIF-era downsample does, instead of picking up whatever happened to sit in the middle. And with Grid Origin: Center the result becomes mirror-exact whenever the cell size is a whole number of pixels: an average has no "centre pixel" to sit half a pixel off the mirror axis (see Grid, below, for the fractional-cell caveat). Original Pixels fill is unchanged by this setting — the original pixels stay original — but an extruded block's height still comes from the cell average, because a block's height is a property of the cell, not of one pixel.
Average: Both — both of the above. This is the "do the right thing" setting for clean-looking mosaics on real footage; start here if you don't want to think about it.
Cells below 2 px always use the centre pixel, in every mode: at 2 px and under there is nothing meaningful left to average, and the field simply does not go finer. You meet this only when Max Levels is high enough for a cell to drop under 2 px — around Max Levels 10 on a 1080p layer, 11 on 4K, but already at the default 8 on a 480 px layer.
Cost. The averages are computed in one extra pass over the layer before the subdivision runs, and the pass is exact (sums accumulate in double precision and the pyramid is built from the sums, not from rounded averages), so the result does not depend on tile order, on the region After Effects asked for, or on preview resolution. Time cost is small — one linear read of the frame. Memory is the thing to know about: roughly 50 bytes per field cell while the field is being built, about 20 bytes per cell for the rest of the frame. At the default Max Levels 8 a 4K frame costs a few megabytes; at Max Levels 12, where the field's finest cells are ~2 px, the same 4K frame measures about 125 MB at the peak of the build and about 48 MB afterwards (2.5 million cells). If a 4K comp at Max Levels 12 gets tight, drop to Max Levels 10 — the visible difference is usually nil, since cells that small are already below the stroke width.
Which sampling should I use?
| Matching an existing v1.3 project | Center Pixel (it is the default; nothing to do) |
| Noisy, grainy or high-ISO footage | Average: Metric — bigger, steadier cells |
| Big root cells / Grid Scale above ~200% | Average: Metric — the metric stops saturating |
| Symmetric artwork with Grid Origin: Center | Average: Fill — mirror-exact with whole-pixel cells |
| Flat or Gradient mosaic on real footage | Average: Fill — true cell colours, no flicker |
| Extruded blocks that jitter in height | Average: Fill — height from the cell average |
| Not sure | Average: Both |
| Chasing the last millisecond, clean source | Center Pixel — no extra pass |
Appearance
site/imgs/quadtree/appearance.pngdrop the file in with this name and it appears hereFill Mode
Flat Cell Color — every cell painted with the colour at its centre. The classic quadtree mosaic.
Original Pixels — the footage stays, only the grid structure shows (use with Stroke). Blueprint / analysis-overlay look.
Gradient Map (Luma) — the cell's brightness picks a colour from a gradient lookup (smooth interpolation).
Gradient — the lookup used by Gradient Map. Custom (4 Colors) interpolates through the four colour wells below (dark → bright). Presets: Rainbow, Nightlight (night-city navy → warm amber), Fire, Ice, Sunset, Neon, Thermal (FLIR-style), Ocean, Grayscale.
Color 1–4 — the Custom gradient stops, dark to bright. Ignored when a preset is selected.
Stroke Width / Stroke Color — cell outline in pixels (0 = none). The stroke is anti-aliased and follows the preview resolution. Thin white strokes over Original Pixels = technical drawing; thick black strokes over Flat = stained-glass.
Stroke Only (transparent fill) — outputs just the outlines on a transparent layer: alpha = stroke coverage (times the layer's own alpha), colour = Stroke Color (straight alpha, as After Effects expects). Use it as an overlay: duplicate the footage, put Quadtree in Stroke Only on the top copy, and blend/glow/offset the wireframe independently of the picture underneath. With Extrude on, the outlines ride on the displaced block tops (a floating wire relief); add Stroke Walls for the full wireframe of every column. Blend With Original mixes the alpha too.
Grid
site/imgs/quadtree/grid.pngdrop the file in with this name and it appears hereGrid Offset X / Y — slides the whole quadtree grid in pixels, with sub-pixel precision (the subdivision structure moves with it). Keyframe X for a scrolling mosaic over a still, wiggle for nervous energy, or line the grid up with a layout/LED wall. Offsets follow the preview resolution.
Grid Origin: Center — off by default. Anchors the quadtree grid to the centre of the layer instead of the top-left corner: the root squares and every subdivision grow outwards from the middle, so symmetric footage stays symmetric and a centred subject sits in the middle of a cell structure rather than on an arbitrary seam. Grid Offset still applies on top of it. Unlike an offset in pixels this is resolution-independent — half a layer is half a layer at any size. (Not to be confused with the Extrude group's Center point, which is where the radial extrusion radiates from.) One measured detail, and its cure: the grid, the subdivision and the strokes mirror exactly, but in Cell Sampling → Center Pixel a Flat or Gradient cell colour is sampled from the cell's centre pixel, which for even-sized cells sits half a pixel off the mirror axis — so mirrored cells can differ by one pixel's worth of sampling. That is a known property of centre-pixel sampling, not of the Center origin. Set Cell Sampling → Average: Fill (or Both) and the fill becomes mirror-exact as well, because a cell average is symmetric where a single centre pixel is not — measured on a mirrored test frame with whole-pixel cells: 86 700 differing channel values → 0. One caveat remains, and it belongs to the grid, not to the sampling: when the cell size is a fraction of a pixel (1080 px at level 4 gives 67.5 px cells), a cell boundary can land exactly on a pixel centre, and the half-open cell rule hands that pixel to the right/lower cell on both sides of the axis. Those boundary columns and rows then differ by one pixel's worth of averaging — measured at about 0.3 % of channel values with 7.5 px cells, invisible in practice, but not bit-exact. For a bit-exact mirror the root cell (layer height × Grid Scale) must halve into whole pixels for every level you use: 1080 px does so only down to level 3 (135 px), whereas a layer height that is a power of two (512, 1024, 2048 px) halves cleanly all the way down. Original Pixels fill is exact in every mode.
Extrude (2.5D)
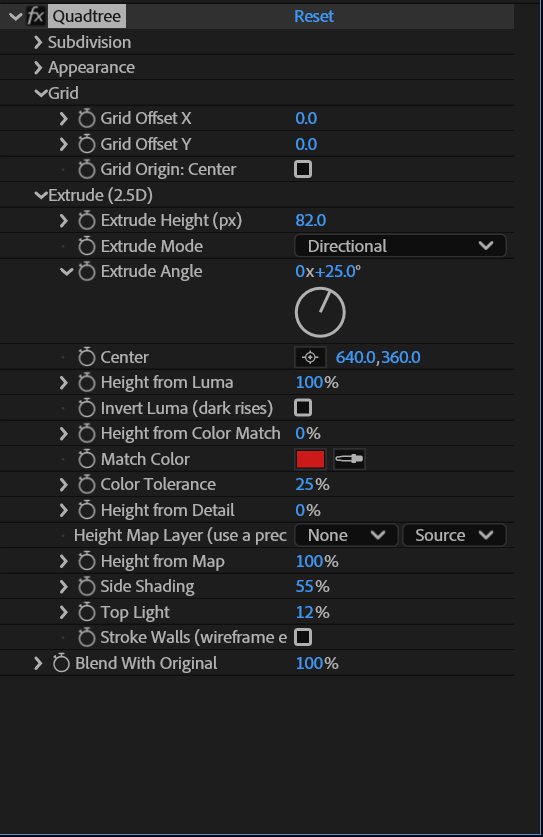
Screen-space extrusion: the mosaic cells rise out of the plane as sharp-edged blocks — no 3D layer, no camera needed. Cells are rigid: each cell moves as one solid square — its own direction and height are constant across the whole cell, so tops stay flat, edges stay straight, nothing bends or smears. Side walls darken, tops lighten with height: that is where the plasticity comes from. Extrude Height 0 = off (and costs nothing).
Extrude Height (px) — the maximum rise. 30–80 px is the sweet spot at 1080p; scale up for 4K.
Extrude Mode
Directional — every block leans the same way, set by Extrude Angle (a rotation dial: 0° = straight up, 90° = right). The classic oblique/axonometric city look.
Radial (From Center) — each block leans away from the Center point along the direction of its own cell centre (drag the crosshair, or keyframe it drifting across the frame). The mosaic erupts outward as rigid blocks, as if pushed from inside; the cell that contains the centre rises straight toward the viewer. At a block's trailing edge (the side facing the centre) you look down its wall — that thin dark strip is the depth cue, not an artifact.
Center is measured on the layer, not on the comp. Like every After Effects point parameter, Center lives in the layer's own coordinate space, before that layer's Scale, Position and Rotation are applied. On a full-frame, untransformed layer the two spaces coincide and the crosshair sits exactly where you expect. Scale the layer and they part company: drop a 3840x2160 clip into a 512x512 comp at 24% and a Center of (128, 384) — near the top-left corner of the 4K frame — lands outside the visible comp altogether, with the blocks fanning out from a point you cannot see. That is normal, and now and then exactly what you want: an eruption originating off-screen. Drag the crosshair rather than typing comp coordinates. And note the effect always runs on the whole layer, so a layer bigger than the comp keeps its blocks out past the comp edges instead of having them clipped away early.
Previews are trustworthy. Center, Extrude Height and the extrusion distance all follow the preview resolution: Full, Half and Quarter put the blocks in the same place, to within a pixel. The same holds while you scrub, where After Effects switches to Adaptive Resolution on the fly.
Height sources (they add up, each with its own weight):
Height from Luma + Invert Luma — bright cells rise; inverted, the dark ones do ("the crowd comes out of the wall, the DJ stays flat").
Height from Color Match + Match Color + Color Tolerance — cells close to the picked colour rise like islands. Pick a costume, a logo colour, a neon sign — only that erupts. Tolerance widens the match.
Height from Detail — the finely subdivided (detailed) cells rise: edges and faces turn into tower clusters while flat areas stay low. (This reads the subdivision level directly.)
Height Map Layer + Height from Map — any layer in the comp drives the height by its luminance (aligned to the top-left corner), sampled once per cell at the cell centre — so the relief is quantised to whole blocks and the cells stay rigid. Use a precomp: like every AE layer parameter, the map is taken from the layer's source, ignoring its own effects and masks — precompose your noise/ripple/gradient setup and pick the precomp. Animate anything in the precomp and the block-relief follows it: a moving Fractal Noise gives a stepping block-wave (Rutt-Etra with cubes).
All height sources are evaluated per cell (Original Pixels fill included — the texture rides on top, the structure underneath stays rigid), and the cell outlines never dent the surface.
Side Shading — how much the block walls darken (0% = none, 100% = black walls). This sells the depth; the default 55% suits most footage.
Top Light — the tops brighten slightly with height.
Stroke Walls (wireframe edges) — the cell outlines always travel with their blocks (painted on the displaced tops). Turn this on and the walls get their edges too: the vertical corner edges of every column and the base edge where it leaves the ground, in Stroke Color, with hidden edges removed — a proper wireframe relief. Combine with Stroke Only for a see-through wire model of the mosaic (glow it, offset it, blend it over the footage).
What a block looks like on screen — a rigid square top, displaced along its direction, plus the wall: the parallelogram the square sweeps from its original place to the top. Outlines are painted on the tops only, never on the walls. With Side Shading around 50% the wall reads as part of the block (so blocks look like elongated hexagons, not squares); at 100% the tops are clean squares on black trails; Stroke Walls draws the column edges so the shape reads at any shading. Very small cells (Max Levels 7–8) with a tall Height produce needle-thin columns — that is real geometry; for a chunky relief use Max Levels 5–6 and a Height of 30–80 px.
Blend With Original — dry/wet mix of the whole effect.
Performance
The subdivision itself is fast (a 4K analysis pass is ~20 ms); a flat (non-extruded) 4K frame renders in a fraction of a second and scales with cores (MFR). Extrude is rendered analytically: every block's column is rasterised once into a depth map (no ray-march, no step size, no quantisation), so a 4K frame with Height 60 costs roughly half a second single-threaded plus the multi-threaded shading pass, and Radial costs about the same as Directional. Cost grows with Height × number of cells (many tiny cells with a tall Height sweep the most pixels). Multi-Frame Rendering renders several frames in parallel. Any Cell Sampling mode other than Center Pixel adds one linear pass over the layer per frame (cheap in time, see that section for memory); Center Pixel costs exactly nothing extra.
Recipes
- Beat-shatter: Convert Audio to Keyframes → pick-whip Detail Threshold with a negative multiplier: on the kick the image shatters into fine cells, then heals. Two more targets on the same Audio Amplitude slider, if you want the beat somewhere other than in the structure: Extrude Height (the city rises and settles — the most physical of the three) and Grid Scale (the whole mosaic breathes in scale while the subdivision rule stays put). ☠ Convert Audio to Keyframes writes one keyframe per frame, so divide the value well down and run Window → The Smoother over the slider if percussive material makes it stutter. Keep Max Levels capped while you do this: a loud frame that drives the threshold to zero will subdivide to the ceiling everywhere and cost accordingly.
- Thermal cam: Gradient Map + Thermal, Stroke 0, Min Levels 3.
- Blueprint: Original Pixels, Stroke 1 px white, Metric Edge, Threshold ~8%.
- Stained glass: Flat + Stroke 3-4 px black, Threshold 20-30%, Luma Bias +30%.
- Scrolling mosaic: still image, keyframe Grid Offset X 0 → 500 over 10 s.
Alpha
The effect leaves the layer's alpha untouched — masks and feathered edges pass through unchanged. (Punching the alpha along the mosaic is GIF Dither's Dither Alpha job.)
Version notes
- v1.4 — Cell Sampling: a popup that switches what the effect reads when it looks at a cell — the classic 9-tap centre sample, or the exact average of every pixel the cell covers, for the subdivision metric, for the fill colour and extrude height, or for both. Averaged metrics stop grain from forcing splits and stop the structure crawling; averaged fills give true cell colours, steady block heights, and a mirror-exact result under Grid Origin: Center with whole-pixel cells (measured: 86 700 differing channel values → 0). Stability is ignored in the averaged metric modes, because the averaging is the smoothing. Default Center Pixel, which is bit-for-bit v1.3.
- v1.3 — Grid Origin: Center: anchors the quadtree grid to the middle of the layer instead of its top-left corner, so symmetric footage stays symmetric and a centred subject sits inside a cell structure rather than on a seam. Resolution-independent, and Grid Offset still applies on top. Off by default.
- v1.2 — the extrude rewritten as an analytic raster: every block's column is rasterised once into a depth map, so there is no ray-march, no quantisation and no Step Size to tune (the parameter is hidden and ignored). Plus Stroke Only (outlines on a transparent layer, straight alpha) and Stroke Walls (the vertical corner edges and base edges of every column, hidden edges removed — a true wireframe relief).
- v1.1 — Grid Scale, the size of the root square as a percentage of the layer height, resolution-independent and keyframable; and the Extrude (2.5D) group: screen-space extrusion of the mosaic cells into rigid blocks, Directional or Radial from a Center point, with height from luma, colour match, subdivision detail or a map layer, shaded by Side Shading and Top Light.
- v1.0 — first working build. Adaptive subdivision with Variance and Edge metrics, Min/Max Levels, Luma Bias, Stability, the Flat / Original Pixels / Gradient Map fills with the shared ivo3d gradient engine, cell strokes, Grid Offset X/Y and Blend With Original. Windows x64, AE 2022+, 8/16/32 bpc, MFR.
Questions & answers
I applied the effect and the picture looks untouched. What am I missing?
Three usual causes, all settings. Fill Mode → Original Pixels with Stroke Width 0 (and Extrude off) shows the footage and no grid — that mode only draws the structure through the stroke, so give it 1 px. A very high Detail Threshold leaves every cell at Min Levels: pull the threshold down and the mosaic breaks down region by region. And the effect needs tonal variation: a flat graphic has no detail to split on. Fastest way to see what the plugin sees: Original Pixels + 1 px white stroke, then sweep Detail Threshold — small cells where the detail lives, one big cell over the flat wall. See Quick start and Subdivision.
The cells jump and crawl frame to frame on grainy footage. What actually cures it?
Not Stability — Cell Sampling. The default Center Pixel judges a cell from nine individual pixels, so a grain speck can force a split or change a cell's colour. Switch Cell Sampling → Average: Both: the split decision compares the averages of the cell's sub-cells (a speck disappears into the average of hundreds of pixels while a real edge still splits), and the fill colour and extrude height come from the cell average, so a bright speck drifting across a cell centre no longer flickers it. The measured result on noisy footage is markedly bigger, calmer cells at the same threshold. In the averaged metric modes Stability is ignored — the averaging is the smoothing. If you stay on Center Pixel, push Stability to 75–100 % (or 0) rather than leaving it in between, where a region can sit on the decision boundary. See Cell Sampling and Subdivision → Stability.
I pushed Grid Scale past 200 % and the subdivision went dumb — why?
With Center Pixel sampling a huge root cell is judged from nine taps spread across it, and that saturates: the metric stops seeing detail. Switch Cell Sampling → Average: Metric (or Both) and the averaged metric keeps resolving as you push Grid Scale to 200 %, 400 % and beyond. Grid Scale itself is resolution-independent (100 % = the layer height; ~178 % spans the full width on 16:9) and fully keyframable — animating it zooms the whole structure. See Cell Sampling and Subdivision → Grid Scale.
How do I make the mosaic shatter on the beat?
Convert Audio to Keyframes on the music layer, then pick-whip Detail Threshold to the Audio Amplitude slider with a negative multiplier: on the kick the threshold drops, the image shatters into fine cells, then heals. Two other targets on the same slider: Extrude Height (the city rises and settles — the most physical) and Grid Scale (the whole mosaic breathes). Divide the value well down and run Window → The Smoother over it if percussive material stutters. And keep Max Levels capped while you do this: a loud frame that drives the threshold to zero subdivides to the ceiling everywhere and costs accordingly (a 4K frame at Max Levels 12 peaks around 125 MB; at 10 the visible difference is usually nil). See the Beat-shatter recipe in Recipes and Cell Sampling → Cost.
Thermal camera, blueprint, stained glass — which settings give the classic looks?
Three fills, three looks. Thermal cam: Fill Mode → Gradient Map (Luma), Gradient Thermal, Stroke 0, Min Levels 3 — the cell's brightness picks a colour from the lookup (Nightlight, Fire, Ice, Neon are the same trick with other ramps, and Custom (4 Colors) builds one from your own four stops, dark to bright). Blueprint: Original Pixels, Stroke 1 px white, Metric Edge (Gradient), Threshold ~8 % — the footage stays, only the analysis grid shows. Stained glass: Flat Cell Color, Stroke 3–4 px black, Threshold 20–30 %, Luma Bias +30 % so the bright end breaks down finer. See Appearance and Recipes.
In Extrude, how do I make only one thing rise — the dancer, the logo colour — and drive the relief from something else?
The height sources add up, each with its own weight, so pick the one that names your subject. Height from Luma raises the bright cells; Invert Luma the dark ones ("the crowd comes out of the wall, the DJ stays flat"). Height from Color Match + Match Color + Color Tolerance raises only cells close to a picked colour — a costume, a neon sign, a logo. Height from Detail raises the finely subdivided cells, so faces and edges become tower clusters over flat ground. Height Map Layer + Height from Map lets any layer drive the height by its luminance — and like every AE layer parameter it reads the layer's source, ignoring its own effects and masks, so precompose your Fractal Noise or gradient and pick the precomp; an animated noise gives a stepping block-wave. With Radial (From Center) remember that Center lives in the layer's coordinate space: on a scaled layer the crosshair can sit off-screen — drag it rather than typing comp coordinates. See Extrude → Height sources.
My extruded blocks are needle-thin columns. How do I get a chunky relief?
That is real geometry, not a rendering fault: with Max Levels 7–8 the cells are tiny, and a tall Extrude Height turns each one into a thin column. For a chunky relief use Max Levels 5–6 and a Height of 30–80 px at 1080p (scale up for 4K). Side Shading around 50 % makes the wall read as part of the block; at 100 % the tops are clean squares on black trails; Stroke Walls draws the column edges so the shape reads at any shading. See Extrude → What a block looks like on screen.
Can I get just the wireframe, on its own layer, to glow or offset over the footage?
Yes. Duplicate the footage, put Quadtree on the top copy with Stroke Only (transparent fill) on: the output is only the outlines on a transparent layer (alpha = stroke coverage, colour = Stroke Color, straight alpha). Add Stroke Walls with an Extrude Height and the vertical corner edges and base edges of every column are drawn too, hidden edges removed — a see-through wire relief. Glow, offset, blend or time-shift that layer independently of the untouched picture underneath. Blend With Original mixes the alpha as well. See Appearance → Stroke Only and Extrude → Stroke Walls.
My artwork is symmetric but the mosaic is not. How do I get a mirror-exact result?
Turn on Grid Origin: Center (Grid group): the root squares and every subdivision grow outwards from the middle instead of the top-left corner, resolution-independently, so a centred subject sits inside a cell structure rather than on a seam. Then set Cell Sampling → Average: Fill (or Both): with centre-pixel sampling an even-sized cell's "centre" sits half a pixel off the mirror axis, whereas a cell average is symmetric (measured: 86 700 differing channel values → 0). The one caveat belongs to the grid, not the sampling: cells that are a fraction of a pixel (1080 px at level 4 = 67.5 px) can differ by a pixel's worth of averaging on the boundary rows — invisible, but not bit-exact. For a bit-exact mirror use a layer height that halves cleanly (512, 1024, 2048 px). See Grid → Grid Origin: Center.
How do I make a still image move — a scrolling or drifting mosaic?
The effect is time-independent, so motion comes from keyframes. Grid Offset X from 0 to 500 px over 10 seconds gives a scrolling mosaic over a still — the whole subdivision structure travels with the grid; wiggle() on both offsets gives nervous energy. Grid Scale keyframed zooms the entire structure in or out, and a Height Map Layer precomp with an animated Fractal Noise turns an extruded mosaic into a stepping block-wave. See Grid and the Scrolling mosaic recipe in Recipes.
Can I trust the Half and Quarter previews?
Yes. Grid Scale is a percentage of the layer height, Max Levels stops at 2 px cells at any resolution, and in Extrude the Center, the Height and the extrusion distance all follow the preview resolution — Full, Half and Quarter put the blocks in the same place to within a pixel, and the same holds while you scrub under Adaptive Resolution. The averaged Cell Sampling modes are exact too: the pyramid is built from sums, so the result does not depend on tile order, on the region requested or on preview resolution. See Extrude → Previews are trustworthy and Cell Sampling.